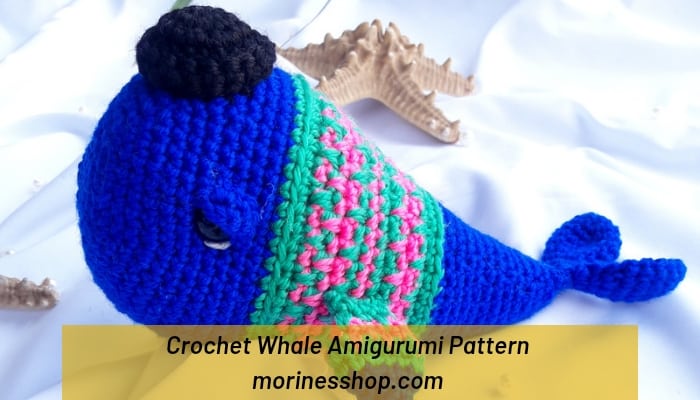
This week we have an adorable crochet whale pattern for our deep sea lovers! Meet Nyangumi, our week 2 crochet pattern using Needles yarn by Crochet Kenya. Isn’t he just adorable?! His name comes from the Swahili word for whale which is nyangumi. Hope you enjoy him as much as you did Cactivae the Cactus.

About the Yarn.
This crochet whale pattern is made using Needles 8 ply acrylic yarn. I’m not going to shut up about how amazing the texture is on these yarn! This time I worked with Royal Blue, Leaf Green and Hot Pink. The head, body, tail and part of the fins of the whale are made using royal blue and boy isn’t it royal!

It’s been a little cold and wet over here so I thought Nyangumi would be feeling the chill too. He has on a sweater made using intervals of sc and deep sc in the hot pink and leaf green. He looks really warm, doesn’t he? You can get this yarn to work on your amigurumi whale as well through Crochet Kenya website.
More nautical-themed patterns
Nyangumi Crochet Whale Pattern
Materials:
- 4 mm crochet hook
- Needles 8 ply acrylic yarn in the colours: Royal blue, Leaf green, Black & Hot pink
- 16 mm safety eyes
- Stitch marker
- Stuffing
- Scissors
- Darning needle
Stitches and terms used:
- Sl st- slip stitch
- Ch- chain
- St(s)- stitches
- Sc- single crochet
- Deep sc- deep single crochet
- Inc- increase
- Dec- decrease
- BLO- back loop only
- FLO- front loop only
Notes:
- Read through the pattern from beginning to end before starting your work just to be sure don’t have any questions that might cause frustration while working on the project.
- For colour changes, when working last stitch in old colour:
- Work as a typical sc until you have 2 loops on your hook.
- Drop the colour you are not using and pick it back up when you need it again in the following rounds.
- Use the new colour to yarn over and pull through both loops on your hook.
- Deep sc is worked with the same steps as a regular sc but instead of working into the current row you are crocheting, you drop down and work into a row below the current row.


- Fasten off by working a sl st in next st.
- Part of the pattern uses magic circle technique. If you are unfamiliar with this method of would like a refresher, I have a detailed tutorial on my blog:- How to Work and Secure the Magic Circle
Instructions:
Head- royal blue
Rnd 1: In a magic circle, work 6 sc (6 sts)
Rnd 2: (inc) 6 times (12 sts)
Rnd 3: (sc, inc) 6 times (18 sts)
Rnd 4: (2 sc, inc) 6 times (24 sts)
Rnd 5: (3 sc, inc) 6 times (30 sts)
Rnd 6: (4 sc, inc) 6 times. (36 sts)
Rnd 7: (5 sc, inc) 6 times (42 sts)
Rnd 8: (6 sc, inc) 6 times (48 sts)
Rnd 9: (15 sc, inc) 3 times (51 sts)
Rnd 10-15: sc in each st across (51 sts)
Rnd 16: (15 sc, dec) 3 times. (48 sts)
Insert eyes between rnds 14 & 15 on opposite sides of the head. Add detailing using ice mint. Make sure the beginning of your rnds is at the top.
Sweater- leaf green & pink
Front this point you’ll interchange between leaf green and hot pink. The colour to use is indicated at the beginning of each rnd. Refer to the notes on how to make colour changes.
Rnd 17: green, sc in each st across (48 sts)
Rnd 18: green, in blo, sc in each st across (48 sts)

Rnd 19: pink, (6 sc, dec) 6 times (42 sts)
Rnd 20: green, (sc, deep sc) across (42 sts)
Rnd 21: pink, (deep sc, sc) across (42 sts)
Rnd 22: pink, sc in each st across (42 sts)

Rnd 23: green, (sc, deep sc) across (42 sts)
Rnd 24: pink, dec, 4 sc, dec, 28 sc, dec, 4 sc (39 sts)
Rnd 25: green, sc in each st across (39 sts)
Rnd 26: green, dec, 4 sc, dec, 25 sc, dec, 4 sc (36 sts)
Rnd 27: pink, (deep sc, sc) across (36 sts)
Rnd 28: pink, dec, 4 sc, dec, 22 sc, dec, 4 sc (33 sts)
Fasten off pink.
Rnd 29: green, (sc, deep sc) 16 times. Sc in last st (33 sts)
Rnd 30: green, dec, 4 sc, dec, 19 sc, dec, 4 sc (30 sts)
Fasten off green. From here on out you will work in royal blue yarn.
Body- royal blue
Rnd 31: In blo, sc in each st across (30 sts)

Rnd 32: dec, 4 sc, dec, 16 sc, dec, 4 sc (27 sts)
Rnd 33: sc in each st across (27 sts)
Rnd 34: dec, 4 sc, dec, 13 sc, dec, 4 sc (24 sts)
Rnd 35: sc in each st across (24 sts)
Rnd 36: dec, 4 sc, dec, 10 sc, dec, 4 sc (21 sts)
Rnd 37: sc in each st across (21 sts)
Rnd 38: dec, 3 sc, dec, 9 sc, dec, 3 sc (18 sts)
Rnd 39: sc in each st across (18 sts)

Rnd 40: dec, 3 sc, dec, 6 sc, dec, 3 sc (15 sts)
Rnd 41: sc in each st across (15 sts)
Rnd 42: (dec, 3 sc) 3 times (12 sts)
Rnd 43: sc in each st across (12 sts)
Rnd 44: (dec, sc) 4 times (8 sts)
Rnd 45: sc in each st across (8 sts)
Fasten off. Weave in end.

Eyelids (make 2) – royal blue
Row 1: 3 sc into a magic circle (3 sts)
Row 2: Ch 1. Turn. (inc) 3 times. (9 sts)
Fasten off. Leave tail for sewing on top of eyes.

Tail (make 2)- royal blue
Rnd 1: 6 sc into magic circle (6 sts)
Rnd 2: (sc, inc) 3 times (9 sts)
Rnd 3: (2 sc, inc) 3 times (12 sts)
Rnd 4: (3 sc, inc) 3 times (15 sts)
Rnd 5: sc in each st. across. (15 sts)
Rnd 6: (3 sc, dec) 3 times (12 sts)
Rnd 7: (sc, dec) 4 times (8 sts)
Rnd 8: sc in each st across (8 sts)
Rnd 9: (dec) 4 times (4 sts)
Fasten off. Leave tail for sewing on body.

Fins (make 2) – royal blue, leaf green & hot pink
You’ll interchange between royal blue, leaf green and hot pink. The colour to use is indicated at the beginning of each rnd. Refer to the notes on how to make colour changes.
Rnd 1: blue, 6 sc into magic circle (6 sts)
Rnd 2: blue, (sc, inc) 3 times (9 sts)
Rnd 3: blue, (2 sc, inc) 3 times (12 sts)
Fasten off blue.
Rnd 4: green, (3 sc, inc) 3 times (15 sts)
Rnd 5: green, sc in each st. across. (15 sts)
Rnd 6: pink, (3 sc, dec) 3 times (12 sts)
Rnd 7: pink, (sc, dec) 4 times (8 sts)
Fasten off pink.
Rnd 8-9: green, sc in each st across (8 sts)
Fasten off. Leave tail for sewing on body.

Beanie- black
Rnd 1: In a magic circle, work 6 sc (6 sts)
Rnd 2: (inc) 6 times (12 sts)
Rnd 3: (sc, inc) 6 times (18 sts)
Rnd 4-5: sc in each st across (18 sts)
Rnd 6: in flo, sc in each st across (18 sts)
Rnd 7: sc in each st across (18 sts)
Fasten off. Leave long tail for sewing onto head.
Finishing:
Now it’s time to join up all the different parts of the crochet whale. Follow the steps below.
1. Attach the tails to the body

2. Attach the fins to the sweater potion of the body.

3. Attach eyelids on top of the eyes.
4. Attach the beanie a bit to the side of the head. Stuff it lightly to give it firmness.

And there you have it. An awesome crochet whale. Isn’t he just adorable! I’d love to see your makes. Use #morinesshop or tag me @morines_shop on Instagram

Did you enjoy learning how to crochet a whale? I’d love to see your creations! Please share your projects with me on Instagram. For more amigurumi patterns, please visit the amigurumi section of the blog.
More needles yarn patterns:
 Kavaluku- free crochet bunny amigurumi pattern - Kavaluku is an adorable crochet bunny amigurumi pattern. Apart from being great for Easter, it would make the most adorable spring baby gift.
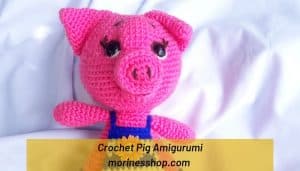 Anguro- Free Crochet Pig Amigurumi Pattern - This free pattern for a cute crochet pig is sure to be a favourite among the little ones, but worth considering for your own as well.
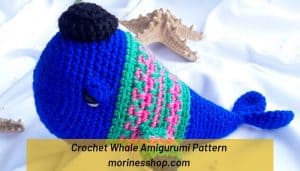 Nyangumi- Free Crochet Whale Amigurumi Pattern - Nyangumi is an adorable free crochet whale amigurumi pattern that would make a perfect gift for any deep sea lovers in your life!
 Cactivae the Cactus- Free crochet cactus pattern - This is a crochet pattern on how to crochet a beautiful cactus doll. The pattern is free and uses simple crochet terms and stitches.