
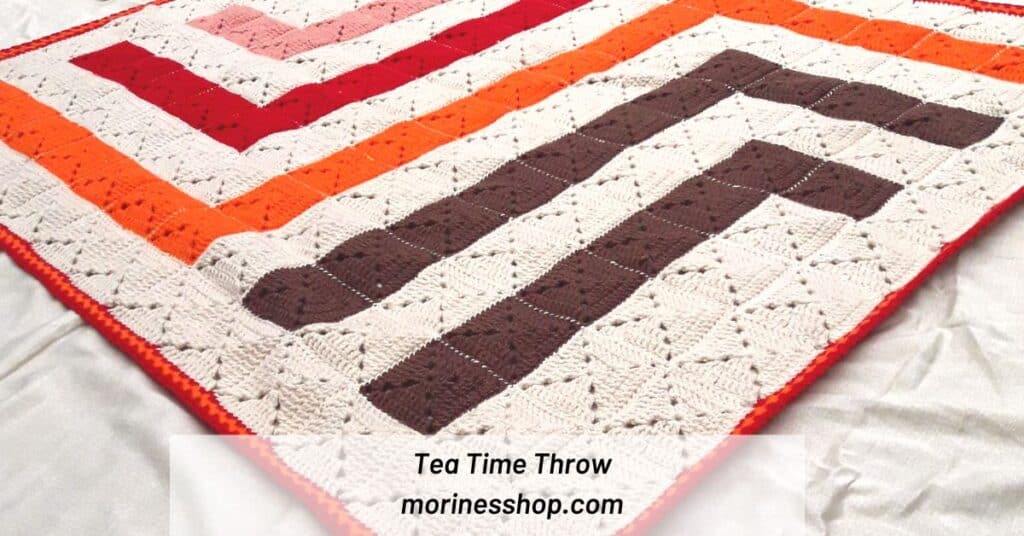
Cozy up under the Tea Time Throw, a mindful and relaxing project that produces a gorgeous solid granny square blanket. The pattern is unique and beginner-friendly using soft and light aran yarn with colours that are rich and vibrant, just like our Kenyan tea!
Get the Tea Time Throw Pattern
Free pattern: Keep scrolling for the FREE tutorial or purchase the ad-free PDF
Keep track of this project by adding it to your Ravelry Queue
Sharing is Caring: Pin this post for later

About this solid granny square blanket
The Tea Time Throw is inspired by the Kenyan Tea “Chai” Culture. Kenyan culture tends to embrace different cultures (with for than 40 tribes claiming it as home) into it. Tea is a holdover from the British Colonial years but the preparation is borrowed from Indian culture. In Kenya, chai mostly refers to tea with milk and sugar. Some (like me) like it spicing it with cinnamon, cardamom, ginger or lemon grass (my favourite)!
Chai is served at breakfast, mid-morning, after (or with) lunch, afternoon, after dinner!! Basically, any time is tea time, thus the name for my crochet blanket.

One of the things I missed during the pandemic was getting invites for tea. Most people make a litre of tea (or more) in the morning, put it in a thermos flask in preparation for the day, and if you receive guests. And these might not be even people you know, most tea invites are for strangers or people passing by.
What size should a throw blanket be?
A typical throw blanket is smaller than your bedding since it’s meant to be for partial coverage and decoration. The Tea Time Throw for instance measures 42 inches by 52 inches, perfect for a snuggle on the couch. The standard crochet throw blanket dimensions are 52 inches by 60 inches. However, throw blankets come in other sizes as well. You can easily customize the size of this blanket by adding more rounds to your granny squares.

How do you make a granny square throw?
A granny square throw is made using granny squares. Make granny squares and join them together. The best place to start is with a solid granny square or classic granny square. After that, add a nice border to tie up the design together and there you have it.

How many granny squares do you need to make a throw blanket?
You will first need to decide on the type of granny square you will use for your blanket. After that, the size of the squares will help you determine how many you’ll make.
About the yarn
Most people know that worsted weight/ aran yarn is my least favourite yarn to work with but was I in for a surprise with Paintbox Aran yarn!
It is so soft and light, and the colours so rich and vibrant! Apart from that, the pattern itself, made from solid granny squares, is simple, satisfying and you can make them anywhere.

Now that the cooler months are approaching, the Tea Time Throw is the perfect project for those calm nights and will keep you warm and cozy once you’re done.
For this pattern I used:
- 6 balls of Vanilla Cream
- 2 balls of Blood Orange
- 2 balls of Coffee Bean
- 1 ball of Vintage Pink
- 1 ball of Pillar Red
Find Paintbox Aran Yarn here.
Tea Time Throw Blanket Pattern
Materials:
- 5mm crochet hook
- Paintbox Aran yarn in following colours and amounts:
- 1,206 yards of Color A (Vanilla Cream
- 402 yards of Color B (Blood Orange)
- 402 yards of Color C (Coffee Bean)
- 201 yards of Color D (Vintage Pink)
- 201 yards of Color E (Pillar Red)
- Scissors
- Large eye darning needle
Stitches and terms used:
- Ch(s)= chain(s)
- Sl st= slip stich
- St(s)= stich(es)
- Sc= single crochet
- Sc2tog= single crochet two together
- Hdc= half double crochet
- Dc= double crochet
Gauge: 14 sts x 7 rows in dc = 4” x 4” (with 5mm hook)
Size: Using the materials and instructions, final measurements of one complete granny square (3 rows) = 3.5” square. Final throw measurements = 42” x 52”
Pattern Notes:
- Read through the pattern before starting your work just to be sure you don’t have any questions that might cause frustration while working on the project.
- Gauge is included for your reference. As this is a throw pattern, achieving gauge is not critical.
- The pattern is worked in solid granny squares that are sewn together using the whip stitch method. A tutorial for this method is provided in the pattern below. You can, however, use whichever method you feel works best for you.
- The border uses the moss stitch. Moss stitch is the sequence of two stitches; the single crochet and the chain stitch repeated over a number of stitches. It is also known as the linen stitch or the granite stitch. For a tutorial or refresher on this stitch, read through this blog post.
- This pattern is written in US crochet terms. For a conversion into UK terms, get my free eBook with the conversion charts here.
Instructions:
- Follow this pattern for solid crochet granny square. You will need a total of:
- 105 squares in Colour A
- 21 squares in Colour B
- 18 squares in Colour C
- 12 squares in Colour D
- 12 squares in Colour E
- Arrange them as shown below

- Join your squares using the whip stitch method or whichever method you find works best for you.
- Weave in your ends. I use the triple tuck method.
- Crochet the border.
Border.
Row 1: Join Color E, at any corner space of the throw. (Ch 1 (counts as 1 sc), sc, ch 2, sc) in the space. Work sc in each stitch across.

When you get to where 2 squares are joined, sc2tog the 2 spaces as shown below.


Continue working sc in each st across, with sc2tog at square intersections and (2sc, ch 2, 2sc) in the corner spaces. Join using a sl st to first sc. Fasten off Colour E.
Row 2: Join Colour B in the 2nd sc, shown below.

Ch 1 (counts as 1 sc and ch-1 space), (sc, ch 2, sc) in the ch-2 corner space. Ch 1. Sc in the next st (shown below)

(Ch 1, skip next sc, sc in next sc) across.
You will continue working the moss stitch the entire row. Be attentive at the corner spaces

Join with sl st to 1st st.

Row 3: Still with Colour B, sl st into next ch-1 sp. ((Ch 1, skip next sc, sc in next sc) across to corner space. (Sc, ch 2, sc) in the ch-2 corner space.) Repeat across. Jon with sl st to 1st st. Fasten off Colour B.

Row 4: Join Colour E at any ch-2 corner space. Ch 3 (counts as 1 sc and ch 2 corner space). Sc in corner space.

((Ch 1, skip next sc, sc in next sc) across to corner space. (Sc, ch 2, sc) in the ch-2 corner space.) Repeat across. Jon with sl st to 1st st. Fasten off Colour E.
