In this post, I’m going to be teaching you how to make a patchwork cardigan. And not just any ordinary one either, nope! We’ll be making a Tunisian crochet patchwork cardigan! If you’re not aware of my love for everything motifs, then you’re in for a treat. Before we get to it, a small history lesson…
Inspiration behind the Tunisian Crochet Patchwork Cardigan.
Back in 2020, Arunima of Knitter Knotter had the Tunisian Sampler CAL. I joined in but debated too much on colours and hook sizes and arrangements and finally gave up the whole thing. This year, I’m going to be a designer and a sponsor in her 3rd Tunisian CAL but that 2020 one still haunts me, LOL.
So I’ve decided to use some of the tutorials from the 2020 Sampler Blanket CAL to make the Tunisian Crochet Patchwork Cardi for the first half of the year. After that, the second half will be used to support the 2022 Tunisian Blanket CAL. By the end of the year, God willing, we’ll have a cardigan and a blanket (for those who’ll do both) to show for it! Exciting right?!

More Tunisian crochet patterns:

- 1. Where to get the patterns
- 2. Size
- 3. Time range
- CAL Schedule:
- Materials:
- Stitches and terms used:
- Notes:
- Patchwork Cardigan Week 24: Joining your squares.
- Week 23: June 13th-19th: Catch-up Week
- Patchwork Cardigan Week 22: Tunisian Top Stitch
- Patchwork Cardigan Week 21: Staggered Yarn Over Stitch
- Patchwork Cardigan Week 20: Tunisian Log Cabin Pattern
- Patchwork Cardigan Week 19: Tunisian Pinwheel Square
- Patchwork Cardigan Week 18: Tunisian Extended Stitches
- Patchwork Cardigan Week 17: Tunisian C2C Entrelac
- Patchwork Cardigan Week 16: Tunisian Textured Waves
- Patchwork Cardigan Week 15: Tunisian Reverse Stitch (trs)
- Patchwork Cardigan Week 14: Cross Stitch on Tunisian Crochet
- Patchwork Cardigan Week 13: Colour Change/ Intarsia
- Patchwork Cardigan Week 12: Mitered Square
- Patchwork Cardigan Week 11: Tunisian Bobble Stitch
- Patchwork Cardigan Week 10: Mori Lace Stitch
- Patchwork Cardigan Week 9: Tunisian Double Crochet Stitch
- Patchwork Cardigan Week 8: Tunisian Cross Stitch
- Patchwork Cardigan Week 7: Tunisian Moss Stitch
- Patchwork Cardigan Week 6: Tunisian Rib Stitch
- Patchwork Cardigan Week 5: Tunisian Honeycomb Stitch (ths)
- Patchwork Cardigan Week 4: Tunisian Knit Stitch (tks)
- Patchwork Cardigan Week 3: Tunisian Purl Stitch (tps)
- Patchwork Cardigan Week 2: Tunisian Full Stitch (tfs)
- Patchwork Cardigan Week 1: Tunisian Simple Stitch (tss)
- Prep week: Jan 3- Jan 9
About the Tunisian Patchwork Cardigan
There’s going to be just a tiny bit of planning, which is always fun with new projects. First off, you’re going to need info on the patterns. Secondly, you’ll need to figure out the size of your cardigan. You can, however skip this step and really think about it. Lastly, you’ll need to have all your squares ready in 24 weeks so we can finalize everything the week after.
1. Where to get the patterns
Both the 2020 and the 2022 Tunisian CAL patterns can be found for free in Arunima’s blog. Since we’re going to be using these 2, I would recommend you get the PDF patterns. And the bonus is, If you add both patterns to your checkout, you get the 2020 one (the one we’ll start with) at 50% off!
I’ll write up the final cardigan pattern but it won’t be available for purchase until July.
2. Size
Although some of the squares we’ll be making will be similar to Arunima’s 2020 CAL, the measurements are going to be different. The final size of your cardigan will determine big you make your squares. What I recommend is measuring your favourite cardigan and using those measurements to determine the size you’ll need. You can use the chart below for reference.

3. Time range
So, how is this whole fun project going to work? Well, first off, we’ll be making a total of 44 squares. I’m hoping to have my cardigan ready for July aka the Kenyan version of Winter. You’ll need to have all your squares ready by the 2nd week of June 2022. We’ll use the last weeks to join, and add the ribbing for the sleeves, neck and bottom part of the cardi.
We’ll be making 2 squares every week. Each week on Monday, I’ll update this post with the pattern. If you’d like to receive email updates together with your Tunisian Crochet Patchwork Cardigan Planner, subscribe below. If you’re already subscribed to my email list, no need to do it again.
Tunisian Crochet Patchwork Cardigan Pattern
CAL Schedule:
Skill Level: Beginner/ Advanced Beginner
- Prep week: Jan 3 – Jan 9
- Week 1: Jan 10 – Jan 16: Tunisian Simple Stitch (tss)
- Week 2: Jan 17 – Jan 23: Tunisian Full Stitch (tfs)
- Week 3: Jan 24 – Jan 30: Tunisian Purl Stitch (tps)
- Week 4: Jan 31 – Feb 6: Tunisian Knit Stitch (tks)
- Week 5: Feb 7 – Feb 13: Tunisian Honeycomb Stitch (ths)
- Week 6: Feb 14 – Feb 20: Tunisian Rib Stitch
- Week 7: Feb 21 – Feb 27: Tunisian Moss Stitch
- Week 8: Feb 28 – Mar 6: Tunisian Cross (X) Stitch
- Week 9: Mar 7 – Mar 13: Tunisian Double Crochet Stitch
- Week 10: Mar 14 – Mar 20: Mori Lace Stitch
- Week 11: Mar 21 – Mar 27: Tunisian Bobble Stitch
- Week 12: Mar 28 – Apr 3: Mitered Square
- Week 13: Apr 4 – Apr 10: Colour Change/ Intarsia
- Week 14: Apr 11 – Apr 17: Cross Stitch on Tunisian Crochet
- Week 15: Apr 18 – Apr 24: Tunisian Reverse Stitch (trs)
- Week 16: Apr 25 – May 1: Tunisian Textured Waves
- Week 17: May 2 – May 8: Tunisian C2C Entrelac
- Week 18: May 9 – May 15: Tunisian Extended Stitches
- Week 19: May 16 – May 22: Tunisian Pinwheel Square
- Week 20: May 23 – May 29: Tunisian Log Cabin Pattern
- Week 21: May 30 – Jun 5: Tunisian Staggered Yarn Over Stitch
- Week 22: Jun 6 – Jun 12: Tunisian Top Stitch
- Week 23: Jun 13- Jun 19: Catch-up week
- Week 24: Joining your squares
Materials:
- 7 mm Tunisian crochet hook (or any size required to meet the gauge). I love this set from KnitPro. They’re smooth, gorgeous and the pointed head makes it easier to pick up stitches.
- Acrylic light worsted weight yarn in a variety of colours. I’m using 10 colours in total; 9 for the squares and the last one for joining and ribbing.
- Stitch markers
- Tape measure
- Scissors
- Darning needle
Stitches and terms used:
- Ch= chain
- St(s)= stitch(es)
- Yo= yarn over
- Sl st(s)= slip stich(es)
- Rpt= repeat
- Dec= decrease: Locate the vertical bars of the next two stitches. Insert your hook into both those vertical bars, yarn over and pull through both vertical bars on the hook.
- Tss3tog= Tunisian simple stitch three together: Yarn over and pull through 4 loops on your hook.
- Lts= last Tunisian stitch: Insert your hook under both loops of the last st on the forward pass and complete as for Tss
- RetP= return pass: Ch 1, (yarn over, pull through 2 loops) repeat across
- Bind off= Make a sl st every time you pick up a loop on your hook
Gauge: 14 sts & 14 rows in tss = 4”
Yarn alternatives: Any DK, Size #3, 8 ply or light worsted weight yarn
Notes:
- The squares are written in 4 sizes; XS/S/M (L/XL, 2XL/3XL, 4XL/5XL)
- Written instructions for the squares are below with links to video tutorials for the specific stitch
- The loop on the hook will count as the first stitch for every row.
Instructions:
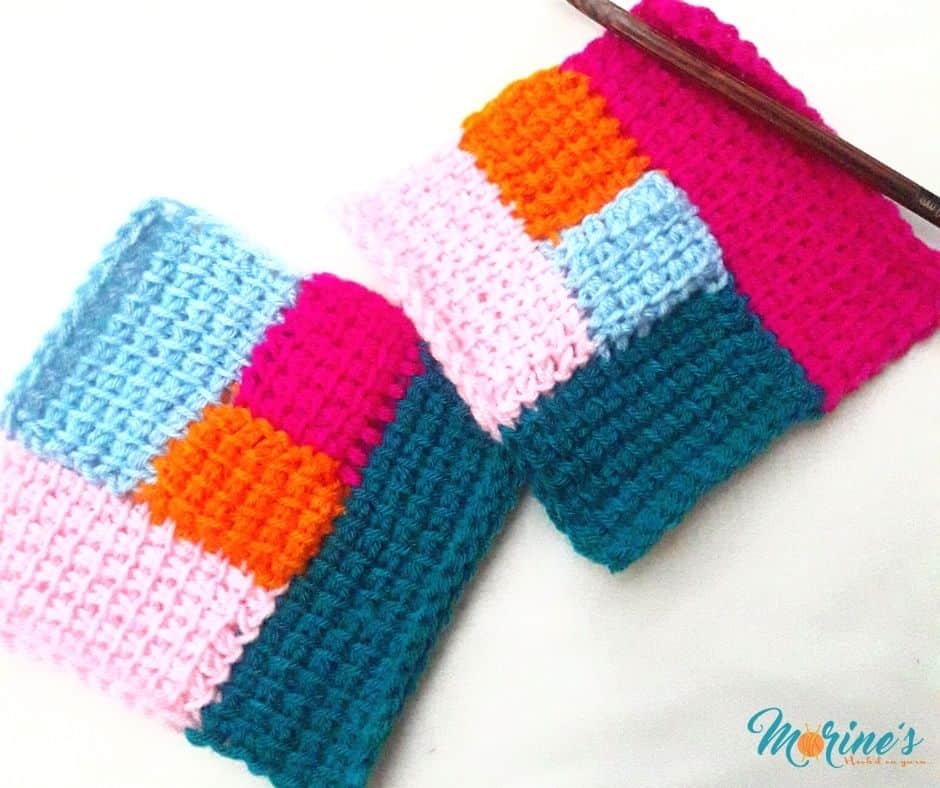
Patchwork Cardigan Week 24: Joining your squares.
You can use different methods to join your squares. Since the stitch totals are about the same on all sides, I’m going to single crochet on the right side for mine.
- Arrange the squares how you’d like them on your cardigan.
- Join them in sections. Your back piece should have 16 squares, your front piece 8 squares each and your sleeves 6 squares each.
- Once you’re done with these sections, join them as shown in the picture below then join the sides indicated by the arrows in the same way.

Week 23: June 13th-19th: Catch-up Week
This week is all about the catch-up. If you have that one square (or 3 or 5) that you haven’t made yet, this is the week to do it. We’ll be joining all our squares and adding the edging in the next 2 weeks. Happy Catch-Up!
Patchwork Cardigan Week 22: Tunisian Top Stitch
And it’s the last week of the square making and we’ve gone full circle. This week’s square is a variation of the Tunisian simple stitch. The Tunisian top stitch is worked similar to the Tunisian simple stitch. The only difference is that the hook is inserted into the back bump of the previous stitches. The resulting pattern is a nice squishy mesh piece of awesomeness. Watch this video tutorial for more on the same. I used teal and hot pink for my squares
Pattern:
Ch 19 (22, 24, 27)
Row 1 (Foundation Row): Insert your hook in the back bump of the 2nd ch from the hook. Yo, pull up a loop. (Insert your hook in the back bump of the next ch, yo, pull up a loop) across. The number of loops on your hook should be the same as the number of chs. RetP.
Row 2- 18 (21, 23, 26): (Insert hook in the back bump of the next stitch, yo, pull up a loop) across. Lts. RetP
Row 19 (22, 24, 27): Bind off using sl sts
Patchwork Cardigan Week 21: Staggered Yarn Over Stitch
This week, our squares will be made using the gorgeous staggered yarn over stitch. The stitch does take a bit of getting used o but once you have it, it’s a breeze. This yarn over pattern is worked over 2 stitches. Before you begin, be sure to watch this tutorial on the same. I used pink and orange for my squares.
Pattern:
Ch 20 (22, 24, 28)
Row 1 (Foundation Row): Insert your hook in the back bump of the 2nd ch from the hook. Yo, pull up a loop. (Insert your hook in the back bump of the next ch, yo, pull up a loop) across. The number of loops on your hook should be the same as the number of chs. RetP.
Row 2: (yarn over, tss, tss, and pull the yarn over over the two tss stitches) across. Lts. RetP.
Row 3: tss (yarn over, tss, tss, and pull the yarn over over the two tss stitches) across. Tss in the last st. Lts. RetP.
Row 4- 14 (16, 18, 20): Rpt Row 2 and 3 (alternating between the two).
Row 15 (17, 19, 21): Bind off using sl sts
Patchwork Cardigan Week 20: Tunisian Log Cabin Pattern
The Tunisian log cabin pattern is worked similar to the traditional log cabin design. This means it’s worked by adding “patches” in a clockwise direction around a center square. The log cabin look is most effective when when similar colours have a “patch” between them or on opposite ends. Watch the video tutorial for more on this. I used orange, hot pink, light blue, pink and teal for my squares.
Pattern:
- Centre patch, colour A
Ch 6 (7, 8, 9)
Row 1 (Foundation Row): Insert your hook in the back bump of the 2nd ch from the hook. Yo, pull up a loop. (Insert your hook in the back bump of the next ch, yo, pull up a loop) across. The number of loops on your hook should be the same as the number of chs. RetP.
Row 2- 6 (7, 8, 9): (Insert hook in the vertical bar, yo, pull up a loop) across. Lts. RetP
Row 7 (8, 9, 10): Bind off using sl sts. Change to colour B in last stitch
- Second patch, colour B
Row 1: Turn your work 90 degrees clockwise. Insert your hook into the 1st stitch on the centre patch . Yo, pull up a loop. (Insert your hook in next st, yo, pull up a loop) across. The number of loops on your hook should be the same as the number of initial chs. RetP.
Row 2- 6 (7, 8, 9): (Insert hook in the vertical bar, yo, pull up a loop) across. Lts. RetP
Row 7 (8, 9, 10): Bind off using sl sts. Change to colour C in last stitch
- Third patch, colour C
Row 1: Turn your work 90 degrees clockwise. Insert your hook into the 1st stitch on the second patch . Yo, pull up a loop. (Insert your hook in next st, yo, pull up a loop) across. There should be 12 (14, 16, 18) loops on your hook. RetP.
Row 2- 6 (7, 8, 9): (Insert hook in the vertical bar, yo, pull up a loop) across. Lts. RetP
Row 7 (8, 9, 10): Bind off using sl sts. Change to colour D in last stitch
- Fourth patch, colour D
Row 1: Turn your work 90 degrees clockwise. Insert your hook into the 1st stitch on the third patch . Yo, pull up a loop. (Insert your hook in next st, yo, pull up a loop) across. There should be 12 (14, 16, 18) loops on your hook. RetP.
Row 2- 6 (7, 8, 9): (Insert hook in the vertical bar, yo, pull up a loop) across. Lts. RetP
Row 7 (8, 9, 10): Bind off using sl sts. Change to colour E in last stitch
- Fifth patch, colour E
Row 1: Turn your work 90 degrees clockwise. Insert your hook into the 1st stitch on the fourth patch . Yo, pull up a loop. (Insert your hook in next st, yo, pull up a loop) across. There should be 18 (21, 24, 27) loops on your hook. RetP.
Row 2- 6 (7, 8, 9): (Insert hook in the vertical bar, yo, pull up a loop) across. Lts. RetP
Row 7 (8, 9, 10): Bind off using sl sts. Fasten off and weave in all your ends
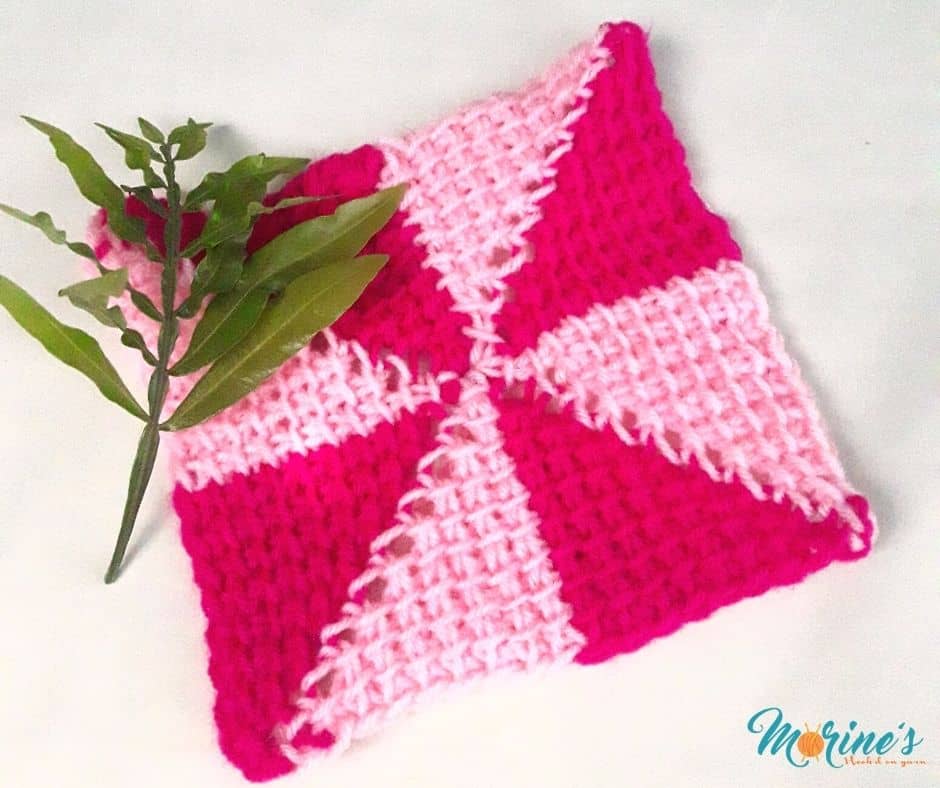
Patchwork Cardigan Week 19: Tunisian Pinwheel Square
This week’s square is worked in short rows similar to Tunisian C2C entrelac but instead of squares, we’ll be using triangles. The Tunisian pinwheel square can be made using a number of basic Tunisian stitches but for this one, we’ll use the Tunisian simple stitch. As usual, be sure to watch this video tutorial before you begin. I used pink and hot pink for my squares.
Pattern:
Ch 3. Join with a slip stitch to the first ch to form a ring
Section 1, decrease section, worked in Colour A:
Ch 10 (12, 13, 14)
Row 1 (Colour A): Insert your hook in the back loop of the 2nd ch from the hook. Yo, pull up a loop. (Insert your hook in the back loop of the next ch, yo, pull up a loop) across. The number of loops on your hook should be the same as the number of chs. Insert your hook into the ring, yo and pull up a loop. (11, 13, 14, 15 loops on your hook). Yarn over and pull through 2 loops all the way to the beginning of the row.
Row 2: Tss in each of the stitches from Row 1 (10, 12, 13, 14 loops on your hook). Yarn over and pull through 2 loops all the way to the beginning of the row.
Row 3: Tss in each of the stitches from the previous row. Yarn over and pull through 2 loops all the way to the beginning of the row.
Row 4- 10 (12, 13, 14): Rpt row 3. With 2 loops left on your hook, change your yarn to colour B
Rotate your work 90 degrees. You will now work on the long edge of the “triangle”.
Section 2, increase section, worked in Colour B:
Row 1: Insert your hook in the horizontal bar from your last row of section 1. Yarn over and pull through both loops on your hook.
Row 2-9 (11, 12, 13): Tss in tss stitch(es) from the previous row. Insert your hook in the horizontal bar of the next row from section one, yarn over and pull up a loop. Yarn over and pull through 2 loops all the way to the beginning of the row.
Row 10 (12, 13, 14): Tss in each tss from the previous row. Insert your hook in the horizontal bar of the next row from section one, yarn over and pull up a loop. Insert your hook into the ring, yarn over and pull up a loop. Yarn over and pull through 2 loops all the way to the beginning of the row.
Repeat section 1 and two 3 times
Fasten off and leave a long tail to sew the 2 open sides together.
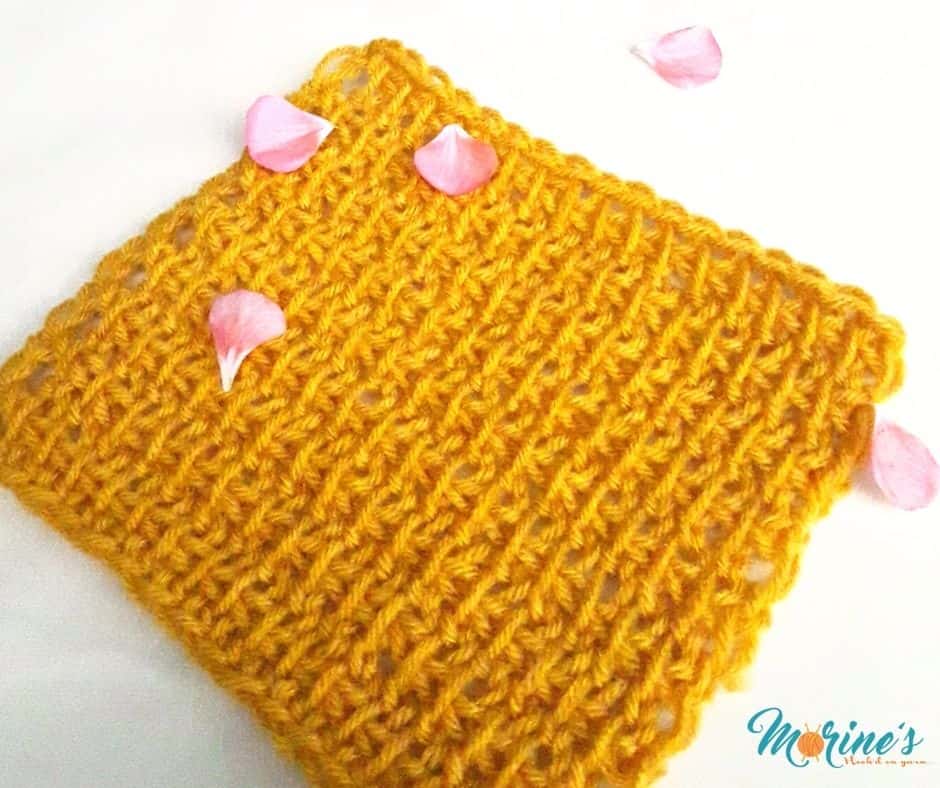
Patchwork Cardigan Week 18: Tunisian Extended Stitches
Extended Tunisian crochet stitches can be worked over a number of basic stitches like simple stitch, full stitch, knit stitch etc. To begin a row of Extended Stitch, make a chain one at the beginning to add extra height. We’ll be using Tunisian simple stitch for our extended stitches. This means that we’ll make a simple stitch, then a chain before moving to the next stitch. Watch this detailed tutorial for more information on the stitch. I used mustard and hot pink for my squares.
Pattern:
Ch 19 (22, 24, 27)
Row 1 (Foundation Row): Insert your hook in the back bump of the 3rd ch from the hook. Yo, pull up a loop. Ch 1. (Insert your hook in the back bump of the next ch, yo, pull up a loop. Ch 1) across. When you get to the lts, insert your hook under both loops of the last st, yarn over an ch 1. RetP.
Row 2- 8 (9, 10, 12): Ch 1, (insert hook in the vertical bar, yo, pull up a loop. Ch 1) across. When you get to the lts, insert your hook under both loops of the last st, yarn over an ch 1. RetP
Row 9 (10, 11, 13): Bind off using sl sts
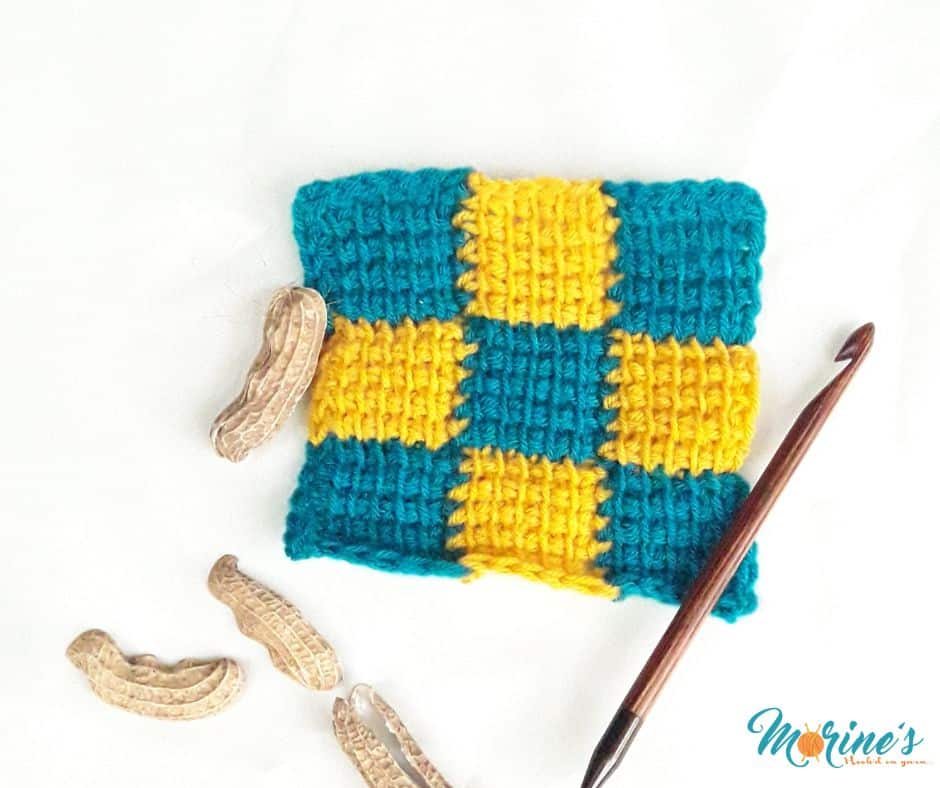
Patchwork Cardigan Week 17: Tunisian C2C Entrelac
Similar to regular Corner-to-Corner (C2C) crochet, Tunisian C2C entrelac is made up of small squares joined together as you go. They are positioned in a way that builds a square, rectangle or triangular piece of fabric. Tunisian C2C entrelac is quite fun and works up fast. Watch this video tutorial for more details on the stitch. I used mustard and teal for my squares.
Pattern:
Ch 7 (8, 9, 10)
Row 1 (Foundation Row in C1): Insert your hook in the back bump of the 2nd ch from the hook. Yo, pull up a loop. (Insert your hook in the back bump of the next ch, yo, pull up a loop) across. The number of loops on your hook should be the same as the number of chs. RetP.
Row 2- 5 (6, 7, 8): (Insert hook in the vertical bar, yo, pull up a loop) across. Lts. RetP
Row 6 (7, 8, 9): Bind off using sl sts
Repeat these steps for every entrelac square. Be sure to watch the video tutorial before you begin.
Patchwork Cardigan Week 16: Tunisian Textured Waves
Tunisian textured waves combines the Tunisian simple, reverse (trs) and double crochet (tdc) stitches to build this beautiful textured wave pattern in Tunisian crochet. It’s quite similar to the wave stitch in regular crochet. For a nice wave effect, we’ll alternated between 2 colours. As usual, watch this video tutorial before you begin. I used marron and hot pink for my squares.

Pattern:
Ch 20 (20, 26, 26)= multiples of 6+2
Row 1 (Foundation Row in C1): Insert your hook in the back bump of the 2nd ch from the hook. Yo, pull up a loop. (Insert your hook in the back bump of the next ch, yo, pull up a loop) across. The number of loops on your hook should be the same as the number of chs. RetP.
Row 2 (C2): (3 trs, 3 tdc) across. Extended lts. RetP
Row 3 [C1]: tss across. Lts. RetP
Row 4 [C2]: Ch 1. (3 tdcs, 3 trs) across. Lts. RetP
Row 5 [C1]: tss across. Lts. RetP
Row 6- 15 (15, 21, 21): Rpt Rows 2-5
Row 16 (16, 22, 22) [C1]: Bind off using sl sts
Patchwork Cardigan Week 15: Tunisian Reverse Stitch (trs)
The Tunisian reverse stitch looks similar to the Tunisian purl stitch (tps). It is worked through the vertical bar like the Tunisian Simple Stitch (tss) except from the back of your piece. This stitch as well is great for adding additional texture to your Tunisian projects. Watch this tutorial before starting your squares for the week. My squares are done in maroon and teal.

Pattern:
Ch 19 (22, 24, 27)
Row 1 (Foundation Row): Insert your hook in the back bump of the 2nd ch from the hook. Yo, pull up a loop. (Insert your hook in the back bump of the next ch, yo, pull up a loop) across. The number of loops on your hook should be the same as the number of chs. RetP.
Row 2- 18 (21, 23, 26): (Insert hook in the back vertical bar, yo, pull up a loop) across. Lts. RetP
Row 19 (22, 24, 27): Bind off using sl sts
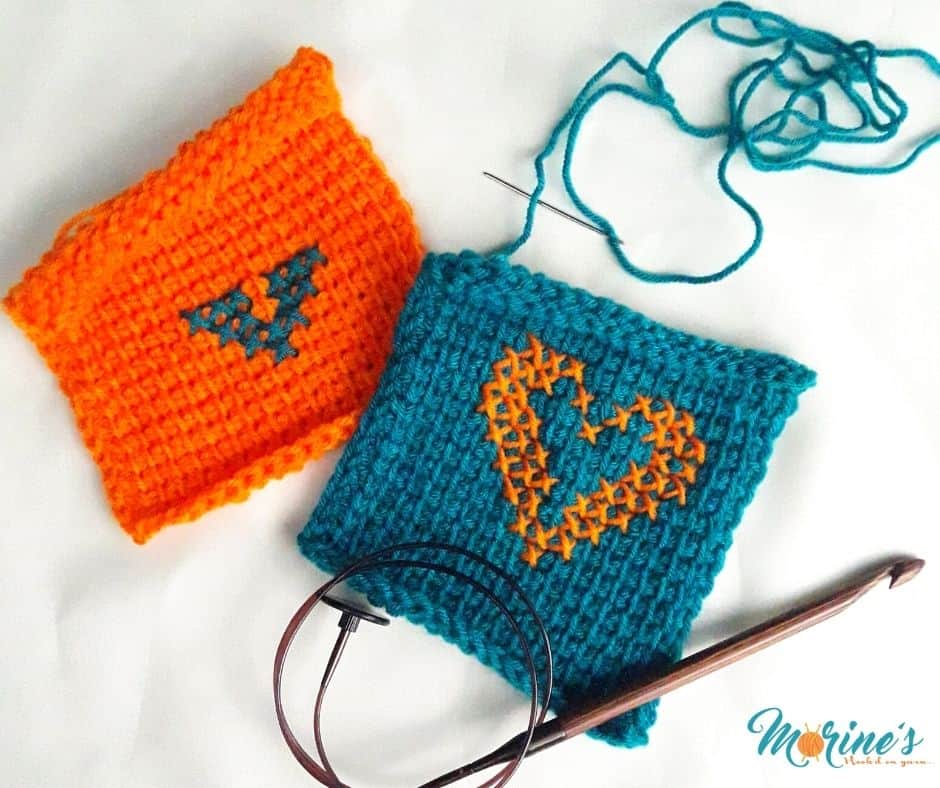
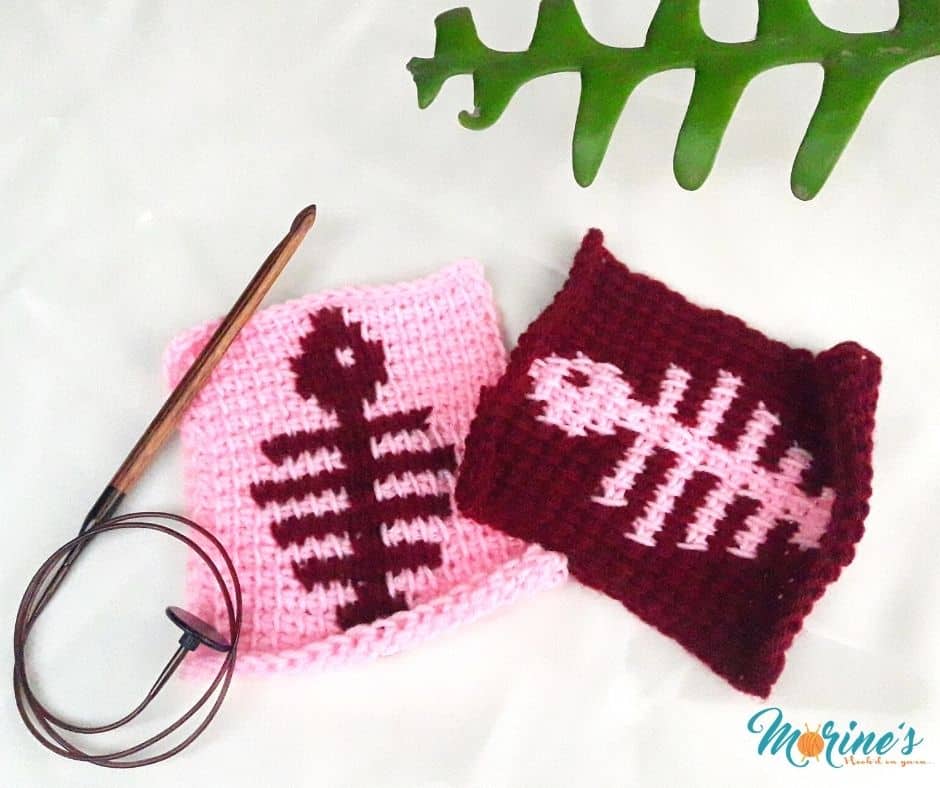
Patchwork Cardigan Week 14: Cross Stitch on Tunisian Crochet
For this week, we’ll be learning an embroidery technique, cross stitch, on Tunisian crochet pieces. For our squares, we’ll be using Tunisian simple stitch square. This is because simple stitches produces nice, dense and even fabric to work the cross stitches on. Go to this tutorial before you begin. I did my squares using orange and teal.
Ch 19 (22, 24, 27)
Pattern:
Row 1 (Foundation Row): Insert your hook in the back bump of the 2nd ch from the hook. Yo, pull up a loop. (Insert your hook in the back bump of the next ch, yo, pull up a loop) across. The number of loops on your hook should be the same as the number of chs. RetP.
Row 2- 18 (21, 23, 26): (Insert hook in the vertical bar, yo, pull up a loop) across. Lts. RetP
Row 19 (22, 24, 27): Bind off using sl sts
Once you have your squares, work cross stitches on them using the chart below.


Patchwork Cardigan Week 13: Colour Change/ Intarsia
This week, we’ll be making our square using colour change or intarsia technique. Although similar to intarsia for regular crochet, it requires a bit of practice due to the return pass. What you need to remember is to keep your yarn at the back of your work and not to pull your yarn too tightly especially after working the colour change. We’ll be using Tunisian simple stitch (tss) and 2 colours (A and B). Watch this video tutorial before you start on your square just to get a better understanding on the same. I used pink and maroon for my squares.
Pattern:
Ch 19 (22, 24, 27)
Row 1 (Foundation Row): Insert your hook in the back bump of the 2nd ch from the hook. Yo, pull up a loop. (Insert your hook in the back bump of the next ch, yo, pull up a loop) across. The number of loops on your hook should be the same as the number of chs. RetP.
XS/S/M
Row 2: (tssA) 17 times, Lts. RetP
Row 3: (tssA) 7 times, (tssB) 4 times, (tssA) 6 times, Lts. RetP
Row 4: (tssA) 8 times, (tssB) 2 times, (tssA) 7 times, Lts. RetP
Row 5: (tssA) 5 times, (tssB) 8 times, (tssA) 4 times, Lts. RetP
Row 6: (tssA) 8 times, (tssB) 2 times, (tssA) 7 times, Lts. RetP
Row 7: (tssA) 4 times, (tssB) 10 times, (tssA) 3 times, Lts. RetP
Row 8: (tssA) 8 times, (tssB) 2 times, (tssA) 7 times, Lts. RetP
Row 9: (tssA) 3 times, (tssB) 12 times, (tssA) 2 times, Lts. RetP
Row 10: (tssA) 8 times, (tssB) 2 times, (tssA) 7 times, Lts. RetP
Row 11: (tssA) 4 times, (tssB) 10 times, (tssA) 3 times, Lts. RetP
Row 12: (tssA) 8 times, (tssB) 2 times, (tssA) 7 times, Lts. RetP
Row 13: (tssA) 7 times, (tssB) 4 times, (tssA) 6 times, Lts. RetP
Row 14: (tssA) 6 times, (tssB) 6 times, (tssA) 5 times, Lts. RetP
Row 15: (tssA) 6 times, (tssB) 2 times, tssA1, (tssB) 3 times, (tssA) 5 times, Lts. RetP
Row 16: (tssA) 7 times, (tssB) 4 times, (tssA) 6 times, Lts. RetP
Row 17: (tssA) 8 times, (tssB) 2 times, (tssA) 7 times, Lts. RetP
Row 18: (tssA) 17 times, Lts. RetP
L/XL
Row 2-3: (tssA) 20 times, Lts1
Row 4: (tssA) 8 times, (tssB) 4 times, (tssA) 8 times, Lts. RetP
Row 5: (tssA) 9 times, (tssB) 2 times, (tssA) 9 times, Lts. RetP
Row 6: (tssA) 6 times, (tssB) 8 times, (tssA) 6 times, Lts. RetP
Row 7: (tssA) 9 times, (tssB) 2 times, (tssA) 9 times, Lts. RetP
Row 8: (tssA) 5 times, (tssB) 10 times, (tssA) 5 times, Lts. RetP
Row 9: (tssA) 9 times, (tssB) 2 times, (tssA) 9 times, Lts. RetP
Row 10: (tssA) 4 times, (tssB) 12 times, (tssA) 4 times, Lts. RetP
Row 11: (tssA) 9 times, (tssB) 2 times, (tssA) 9 times, Lts. RetP
Row 12: (tssA) 5 times, (tssB) 10 times, (tssA) 5 times, Lts. RetP
Row 13: (tssA) 9 times, (tssB) 2 times, (tssA) 9 times, Lts. RetP
Row 14: (tssA) 8 times, (tssB) 4 times, (tssA) 8 times, Lts. RetP
Row 15: (tssA) 7 times, (tssB) 6 times, (tssA) 7 times, Lts. RetP
Row 16: (tssA) 7 times, (tssB) 2 times, tssA1, (tssB) 3 times, (tssA) 7 times, Lts. RetP
Row 17: (tssA) 8 times, (tssB) 4 times, (tssA) 8 times, Lts. RetP
Row 18: (tssA) 9 times, (tssB) 2 times, (tssA) 9 times, Lts. RetP
Row 19-21: (tssA) 20 times, Lts. RetP
2XL/ 3XL
Row 2-4: (tssA) 22 times, Lts. RetP
Row 5: (tssA) 9 times, (tssB) 4 times, (tssA) 9 times, Lts. RetP
Row 6: (tssA) 10 times, (tssB) 2 times, (tssA) 10 times, Lts. RetP
Row 7: (tssA) 7 times, (tssB) 8 times, (tssA) 7 times, Lts. RetP
Row 8: (tssA) 10 times, (tssB) 2 times, (tssA) 10 times, Lts. RetP
Row 9: (tssA) 6 times, (tssB) 10 times, (tssA) 6 times, Lts. RetP
Row 10: (tssA) 10 times, (tssB) 2 times, (tssA) 10 times, Lts. RetP
Row 11: (tssA) 5 times, (tssB) 12 times, (tssA) 5 times, Lts. RetP
Row 12: (tssA) 10 times, (tssB) 2 times, (tssA) 10 times, Lts. RetP
Row 13: (tssA) 6 times, (tssB) 10 times, (tssA) 6 times, Lts. RetP
Row 14: (tssA) 10 times, (tssB) 2 times, (tssA) 10 times, Lts. RetP
Row 15: (tssA) 9 times, (tssB) 4 times, (tssA) 9 times, Lts. RetP
Row 16: (tssA) 8 times, (tssB) 6 times, (tssA) 8 times, Lts. RetP
Row 17: (tssA) 8 times, (tssB) 2 times, tssA1, (tssB) 3 times, (tssA) 8 times, Lts. RetP
Row 18: (tssA) 9 times, (tssB) 4 times, (tssA) 9 times, Lts. RetP
Row 19: (tssA) 10 times, (tssB) 2 times, (tssA) 10 times, Lts. RetP
Row 20-23: (tssA) 22 times, Lts. RetP
4XL/ 5XL
Row 2-6: (tssA) 25 times, Lts. RetP
Row 7: (tssA) 10 times, (tssB) 4 times, (tssA) 11 times, Lts. RetP
Row 8: (tssA) 11 times, (tssB) 2 times, (tssA) 12 times, Lts. RetP
Row 9: (tssA) 8 times, (tssB) 8 times, (tssA) 9 times, Lts. RetP
Row 10: (tssA) 11 times, (tssB) 2 times, (tssA) 12 times, Lts. RetP
Row 11: (tssA) 7 times, (tssB) 10 times, (tssA) 8 times, Lts. RetP
Row 12: (tssA) 11 times, (tssB) 2 times, (tssA) 12 times, Lts. RetP
Row 13: (tssA) 6 times, (tssB) 12 times, (tssA) 7 times, Lts. RetP
Row 14: (tssA) 11 times, (tssB) 2 times, (tssA) 12 times, Lts. RetP
Row 15: (tssA) 7 times, (tssB) 10 times, (tssA) 8 times, Lts. RetP
Row 16: (tssA) 11 times, (tssB) 2 times, (tssA) 12 times, Lts. RetP
Row 17: (tssA) 10 times, (tssB) 4 times, (tssA) 11 times, Lts. RetP
Row 18: (tssA) 9 times, (tssB) 6 times, (tssA) 10 times, Lts. RetP
Row 19: (tssA) 9 times, (tssB) 2 times, tssA1, (tssB) 3 times, (tssA) 10 times, Lts. RetP
Row 20: (tssA) 10 times, (tssB) 4 times, (tssA) 11 times, Lts. RetP
Row 21: (tssA) 11 times, (tssB) 2 times, (tssA) 12 times, Lts. RetP
Row 22-26: (tssA) 25 times, Lts. RetP
Row 19 (22, 24, 27): Bind off using sl sts
Patchwork Cardigan Week 12: Mitered Square
Mitered squares can be made using either increases or decreases. This mitered square is made using the decrease method with Tunisian simple stitches. This means we will start with the maximum number of stitches and gradually decrease to form our square. Watch this video tutorial before you start on your square just to get a better understanding on the same. I used light blue and hot pink for my squares.

Pattern:
Ch 37 (43, 47, 53)
Row 1 (Foundation Row): Insert your hook in the back bump of the 2nd ch from the hook. Yo, pull up a loop. (Insert your hook in the back bump of the next ch, yo, pull up a loop) across. The number of loops on your hook should be the same as the number of chs.
Before working the return pass, place a stitch marker in the middle stitch. That is on stitch 19 (22, 24, 26). Decreases will be worked over the return pass
Retp: Ch 1. [Yarn over and pull through 2 loops] (16, 19, 21, 23) times. Yarn over and pull through 4 loops on your hook (tss3tog). From here, yarn over and pull through 2 loops all the way to the beginning
Row 2: Tss 16 (19, 21, 23) times. You should have 17 (20, 22, 24) loops on your hook. Insert your hook through the back horizontal bar of the decrease cluster. Continue working simple stitches all the way to the end. Lts.
Retp: Ch 1. [Yarn over and pull through 2 loops] (15, 18, 20, 22) times. Tss3tog. From here, yarn over and pull through 2 loops all the way to the beginning
Row 3: Tss 15 (18, 20, 22) times. You should have 16 (19, 21, 23) loops on your hook. Insert your hook through the back horizontal bar of the decrease cluster. Continue working simple stitches all the way to the end. Lts.
Retp: Ch 1. [Yarn over and pull through 2 loops] (14, 17, 19, 21) times. Yarn over and pull through 4 loops on your hook. From here, yarn over and pull through 2 loops all the way to the beginning
Row 4: Tss 14 (17, 19, 21) times. Insert your hook through the back horizontal bar of the decrease cluster. Continue working simple stitches all the way to the end. Lts.
Retp: Ch 1. [Yarn over and pull through 2 loops] (13, 16, 18, 20) times. Tss3tog. Yarn over and pull through 2 loops all the way to the beginning
By now you should have gotten into the rhythm of the mitered square. What you need to remember is this:
- Make Simple Stitches on top of every stitch from the previous row except for the stitch in the middle where you insert into the back horizontal bar.
- You will work a three stitch decrease (the 3 middle stitches) aka tunisian simple stitch 3 together (tss3tog) while working the reverse pass for each row. This is where you will yarn over and pull through 4 loops on your hook.
- Keep moving the stitch marker so you don’t loose sight of the middle stitch where the tss3tog is made.
Row 5: Tss to st before marked st. Insert your hook through the back horizontal bar of the decrease cluster (move stitch marker up), tss to last st. Lts.
RetP: Ch 1. Yarn over and pull through 2 loops until the stitch before the marker. Tss3tog. Yarn over and pull through 2 loops all the way to the beginning
Repeat Row 5 until the working row has 5 stitches.
Retp for Row 17 (20, 22, 25): Ch 1. Tss3tog. Yarn over and pull through 2 loops
Row 18 (21, 23, 26): Insert your hook through the back horizontal bar of the decrease cluster. Lts. Yarn over and pull through all 3 loops on your hook.
Fasten off and weave in your ends.
Patchwork Cardigan Week 11: Tunisian Bobble Stitch
The tunisian bobble stitch, much like regular crochet bobble stitches, consists of three or more tunisian double crochet stitches worked together. They are really great for adding texture to your work. The bobble itself is worked by inserting your hook between into the space between the two vertical bars of the next stitch. Visit this post for a tutorial on the same. I’m using mustard and hot pink for my squares.

Pattern:
Ch 19 (22, 24, 27)
Row 1 (Foundation Row): Insert your hook in the back bump of the 2nd ch from the hook. Yo, pull up a loop. (Insert your hook in the back bump of the next ch, yo, pull up a loop) across. The number of loops on your hook should be the same as the number of chs. RetP.
XS/ S/ M
Row 2-3: (tss) 17 times, Lts. RetP
Row 4: (tss) 5 times, bobble, (tss) 2 times, bobble, (tss) 2 times, bobble, (tss) 5 times, Lts. RetP
Row 5-6: (tss) 17 times, Lts. RetP
Row 7: (tss) 3 times, bobble, (tss) 9 times, bobble, (tss) 3 times, Lts. RetP
Row 8-9: (tss) 17 times, Lts. RetP
Row 10: tss, bobble, (tss) 13 times, bobble, tss, Lts. RetP
Row 11-12: (tss) 17 times, Lts. RetP
Row 13: (tss) 3 times, bobble, (tss) 9 times, bobble, (tss) 3 times, Lts. RetP
Row 14-15: (tss) 17 times, Lts. RetP
Row 16: (tss) 5 times, bobble, (tss) 2 times, bobble, (tss) 2 times, bobble, (tss) 5 times, Lts. RetP
Row 17-18: (tss) 17 times, Lts. RetP
L/ XL
Row 2-4: (tss) 20 times, Lts. RetP
Row 5: (tss) 7 times, bobble, (tss) 2 times, bobble, (tss) 2 times, bobble, (tss) 6 times, Lts. RetP
Row 6-7: (tss) 20 times, Lts. RetP
Row 8: (tss) 5 times, bobble, (tss) 9 times, bobble, (tss) 4 times, Lts. RetP
Row 9-10: (tss) 20 times, Lts. RetP
Row 11: (tss) 3 times, bobble, (tss) 13 times, bobble, (tss) 2 times, Lts. RetP
Row 12-13: (tss) 20 times, Lts. RetP
Row 14: (tss) 5 times, bobble, (tss) 9 times, bobble, (tss) 4 times, Lts. RetP
Row 15-16: (tss) 20 times, Lts. RetP
Row 17: (tss) 7 times, bobble, (tss) 2 times, bobble, (tss) 2 times, bobble, (tss) 6 times, Lts. RetP
Row 18-21: (tss) 20 times, Lts. RetP
2XL/ 3XL
Row 2-5: (tss) 22 times, Lts. RetP
Row 6: (tss) 8 times, bobble, (tss) 2 times, bobble, (tss) 2 times, bobble, (tss) 7 times, Lts . RetP
Row 7-8: (tss) 22 times, Lts. RetP
Row 9: (tss) 6 times, bobble, (tss) 9 times, bobble, (tss) 5 times, Lts. RetP
Row 10-11: (tss) 22 times, Lts. RetP
Row 12: (tss) 4 times, bobble, (tss) 13 times, bobble, (tss) 3 times, Lts. RetP
Row 13-14: (tss) 22 times, Lts RetP
Row 15: (tss) 6 times, bobble, (tss) 9 times, bobble, (tss) 5 times, Lts RetP
Row 16-17: (tss) 22 times, Lts. RetP
Row 18: (tss) 8 times, bobble, (tss) 2 times, bobble, (tss) 2 times, bobble, (tss) 7 times, Lts. RetP
Row 19-23: (tss) 22 times, Lts. RetP
4XL/ 5XL
Row 2-7: (tss) 25 times, Lts. RetP
Row 8: (tss) 9 times, bobble, (tss) 2 times, bobble, (tss) 2 times, bobble, (tss) 9 times, Lts. RetP
Row 9-10: (tss) 25 times, Lts. RetP
Row 11: (tss) 7 times, bobble, (tss) 9 times, bobble, (tss) 7 times, Lts. RetP
Row 12-13: (tss) 25 times, Lts. RetP
Row 14: (tss) 5 times, bobble, (tss) 13 times, bobble, (tss) 5 times, Lts. RetP
Row 15-16: (tss) 25 times, Lts. RetP
Row 17: (tss) 7 times, bobble, (tss) 9 times, bobble, (tss) 7 times, Lts. RetP
Row 18-19: (tss) 25 times, Lts. RetP
Row 20: (tss) 9 times, bobble, (tss) 2 times, bobble, (tss) 2 times, bobble, (tss) 9 times, Lts. RetP
Row 21-26: (tss) 25 times, Lts. RetP
Row 19 (22, 24, 27): Bind off using sl sts
Patchwork Cardigan Week 10: Mori Lace Stitch
The Mori Lace stitch is a gorgeous stitch pattern that has a similar ‘feel’ to miss stitch. It’s a two-row repeat pattern worked using the Tunisian simple stitch, full stitch and tunisian decrease. This pattern works best with even chains. Because of this, for sizes XS/S/M and 4XL-5XL we will be working one extra chain from our usual number. Visit this post for a video tutorial on the stitch. I’m using teal and light blue for my squares.
Pattern:
Ch 20 (22, 24, 28)
Row 1 (Foundation Row): Insert your hook in the back bump of the 2nd ch from the hook. Yo, pull up a loop. (Insert your hook in the back bump of the next ch, yo, pull up a loop) across. The number of loops on your hook should be the same as the number of chs. RetP.
Row 2: (dec, yarn over) across. Lts. RetP. Tip: As you get to the end of the row, don’t forget to yarn over before working the Lts.
Row 3: (tss in the tss from the previous row, tfs in chain space) across. Lts. RetP
Row 4- 18 (21, 23, 26): Rpt Row 2 and 3 (alternating between the two). Tip: Be sure to count the loops on your hook until you get the rhythm of this. stitch
Row 19 (22, 24, 27): Bind off using sl sts
Patchwork Cardigan Week 9: Tunisian Double Crochet Stitch
The Tunisian Double Crochet Stitch is a great beginner stitch because it is worked very similarly to the regular double crochet stitch. You can create different looks and textures, depending on how the hook is inserted into the stitches. For our squares, we will work by inserting the hook just like for a Tunisian simple stitch. Visit this blog post for more details and tutorials on the same. I used rust and mustard for my squares.
Pattern:
Ch 19 (22, 24, 27)
Row 1 (Foundation Row): Yo, insert your hook in the back bump of the 3rd ch from the hook. Yo, pull up a loop. Yo, pull through 2 loops. (Yo, insert your hook in the back bump of the next ch, yo, pull up a loop, yo, pull through 2 loops) across. The number of loops on your hook should be the same as the number of chs. RetP.
Row 2- 7 (8, 9, 11): (Yo, insert hook in the vertical bar, yo, pull up a loop. Yo, pull through 2 loops) across. When you get to the lts, yo, insert your hook under both loops of the last st, yo, pull through 2 loops. RetP
Row 8 (9, 10, 12): Bind off using sl sts
Patchwork Cardigan Week 8: Tunisian Cross Stitch
This week’s square is made using the Tunisian cross stitch aka Tunisian x stitch. This stitch is worked similar to the Tunisian simple stitch but crossed over to make an ‘X’. The resulting pattern has little X’s on the front and makes a nice ribbed fabric. Visit this blog post for more details and tutorials on the same. I used orange and hot pink for my squares.
Note: This pattern works best with even chains. Because of this, we will be working one extra chain from our usual number.
Pattern:
Ch 20 (22, 24, 28)
Row 1 (Foundation Row): Insert your hook in the back bump of the 2nd ch from the hook. Yo, pull up a loop. (Insert your hook in the back bump of the next ch, yo, pull up a loop) across. The number of loops on your hook should be the same as the number of chs. RetP.
Row 2-18 (21, 23, 26): (skip st, tss in next st. Tss in skipped st) across. Lts. RetP
Row 19 (22, 24, 27): Bind off using sl sts
Patchwork Cardigan Week 7: Tunisian Moss Stitch
I’ve designed both blankets and amigurumi with regular moss stitch, which is a big sign that I’m a fan of the stitch. Just like regular moss stitch, tunisian moss stitch is made using a two-row repeat. We will be working using the Tunisian knit stitch (tks) in the second and second to last row. The other rows in between will use Tunisian full stitch (tfs). Visit this blog post for more details and tutorials on the same. I used maroon and grey for my squares.

Pattern:
Ch 19 (22, 24, 27)
Row 1 (Foundation Row): Insert your hook in the back bump of the 2nd ch from the hook. Yo, pull up a loop. (Insert your hook in the back bump of the next ch, yo, pull up a loop) across. The number of loops on your hook should be the same as the number of chs. RetP.
Row 2: (tks, yarn over, skip the next st) across. Lts. RetP
Row 3: (tfs in the chain space, yarn over) across .Lts. RetP
Row 4- 17 (20, 22, 25): Rpt Row 2 and 3 (alternating between the two). Tip: your spaces will line up on top of full stitches and your full stitches will be worked into the spaces. Be sure to count the loops on your hook until you get the rhythm of this. stitch
Row 18 (21, 23, 26): Make a (tks in the full stitch below, tfs in the chain space) across. Lts. RetP
Row 19 (22, 24, 27): Bind off using sl sts
Patchwork Cardigan Week 6: Tunisian Rib Stitch
This week we’ll be working another stitch made from a combination of 2 stitches. The Tunisian rib stitch is a combination of the simple stitch and the twisted stitch (twtss). The resulting stitch The Tunisian rib stitch makes a pretty pattern of V-stitches. Visit this blog post for more details and tutorials on the same. I used pink and blue for my squares.

Pattern:
Ch 19 (22, 24, 27)
Row 1 (Foundation Row): Insert your hook in the back bump of the 2nd ch from the hook. Yo, pull up a loop. (Insert your hook in the back bump of the next ch, yo, pull up a loop) across. The number of loops on your hook should be the same as the number of chs. RetP.
Row 2: (tss, twtss) across. Lts. RetP
Row 3- 18 (21, 23, 26): Rpt row 2
Row 19 (22, 24, 27): Bind off using sl sts
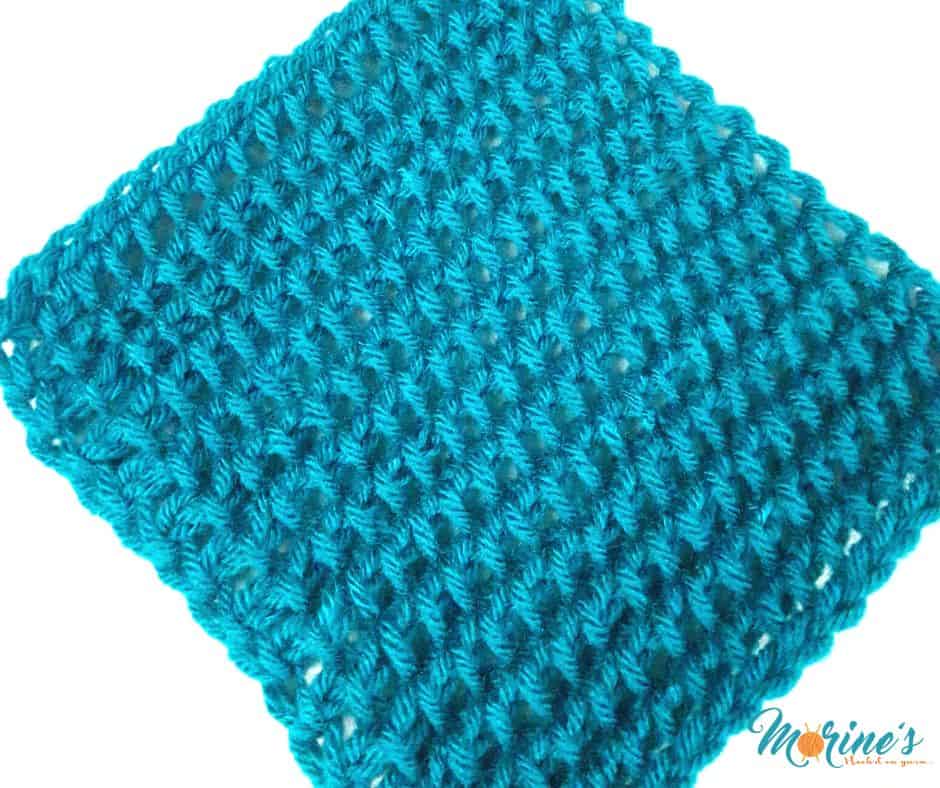
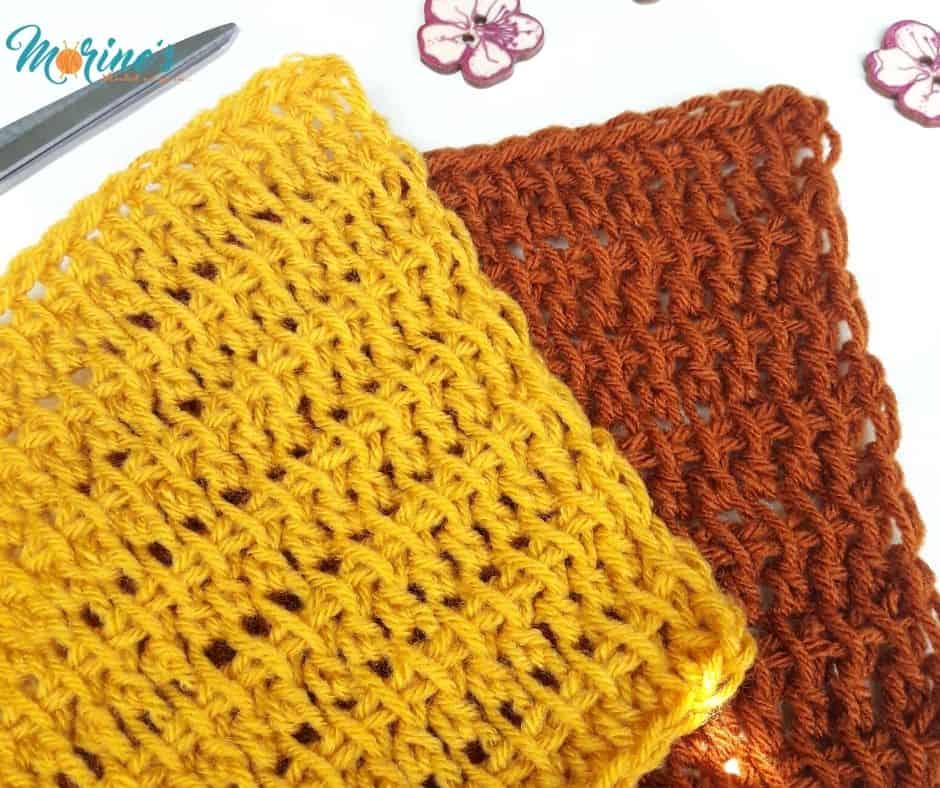
Patchwork Cardigan Week 5: Tunisian Honeycomb Stitch (ths)
Now that we’re in week 5 of the Tunisian Patchwork Cardigan CAL, I thought it’d be the perfect time to combine 2 stiches that we’ve previously worked on. The Tunisian Honeycomb stitch is one of my favourite stitches. It’s a simple stitch repeat combining the Tunisian Simple Stitch (tss) with the Tunisian Purl Stitch (tps) to create a gorgeous, honeycomb texture. It can be worked over any number of stitches. Visit this blog post for more details and tutorials on the same. I used mustard and orange for my squares.

Pattern:
Ch 19 (22, 24, 27)
Row 1 (Foundation Row): Insert your hook in the back bump of the 2nd ch from the hook. Yo, pull up a loop. (Insert your hook in the back bump of the next ch, yo, pull up a loop) across. The number of loops on your hook should be the same as the number of chs. RetP.
Row 2: (tss, tps) across. Lts. RetP
Row 3: (tps, tss) across. Lts. RetP
Row 4- 18 (21, 23, 26): Rpt row 2 & 3
Row 19 (22, 24, 27): Bind off using sl sts
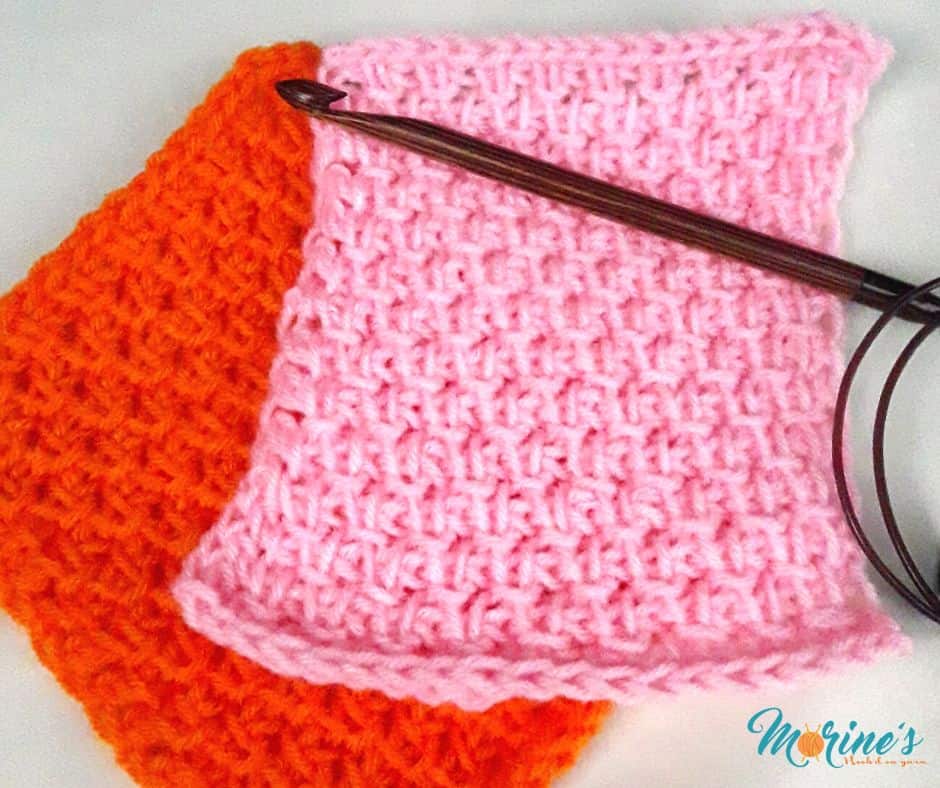
Patchwork Cardigan Week 4: Tunisian Knit Stitch (tks)
If you’re like me and love the knit-look but prefer to crochet, the Tunisian Knit Stitch (tks) is for you! It s the most knit-like stitch in crochet. As you can see from the photo, it looks almost identical to knitting and can be quite hard to tell the two apart. It’s a really easy stitch to learn and just like the Tunisian simple stitch it can be worked over any number of stitches. Visit this blog post for more details and tutorials on the same. I used grey and orange for my squares.

Pattern:
Ch 19 (22, 24, 27)
Row 1 (Foundation Row): Insert your hook in the back bump of the 2nd ch from the hook. Yo, pull up a loop. (Insert your hook in the back bump of the next ch, yo, pull up a loop) across. The number of loops on your hook should be the same as the number of chs. RetP.
Row 2- 18 (21, 23, 26): (Insert the hook into the space between the two vertical bars of the next st. Yo and pull up a loop) across. Lts. RetP
Row 19 (22, 24, 27): Bind off using sl sts
Patchwork Cardigan Week 3: Tunisian Purl Stitch (tps)
I will not lie, this is one of my least favourite Tunisian crochet stitches. The Tunisian Purl Stitch is similar to the tss in that it is has a one-row repeat and can be worked over any number of stitches. The difference is by the placement of your yarn. With tps, you’ll bring your yarn to the front of your piece, then insert the hook into the vertical bar of said stitch for the forward pass. Visit this blog post for more details and tutorials on the same. I used mustard and hot pink yarn for my squares.

Pattern:
Ch 19 (22, 24, 27)
Row 1 (Foundation Row): Insert your hook in the back bump of the 2nd ch from the hook. Yo, pull up a loop. (Insert your hook in the back bump of the next ch, yo, pull up a loop) across. The number of loops on your hook should be the same as the number of chs. RetP.
Row 2- 18 (21, 23, 26): (Bring your yarn to the front of your piece, then insert the hook into the vertical bar of the st. Yo and pull that working yarn) across. You’ll now have a bar running horizontally for that stitch Lts. RetP
Row 19 (22, 24, 27): Bind off using sl sts
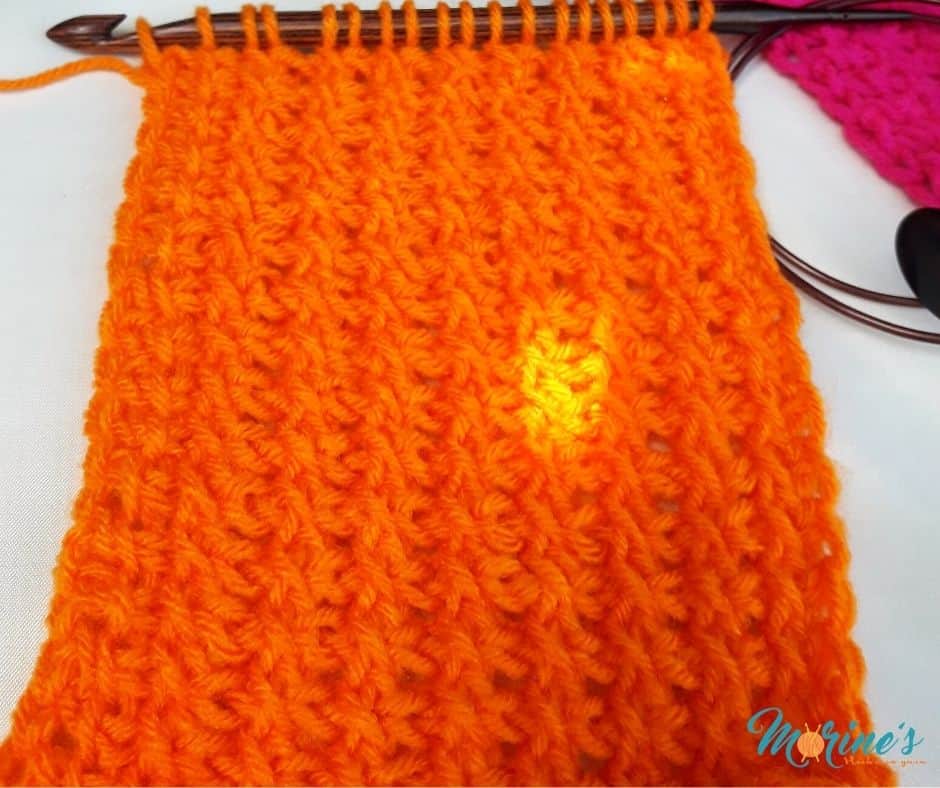
Patchwork Cardigan Week 2: Tunisian Full Stitch (tfs)
The Tunisian full stitch is a two-row repeat stitch. This means there are two different forward passes which alternate each row. Tfs is worked by pulling up loops between stitches instead of working into the stitches. Because of this, the Tunisian Full Stitch reminds me of the Moss Stitch in regular crochet. For a beginner, the stitch is best understood with a video tutorial. Visit this blog post for more details and tutorials on the same. I used light blue and orange for my squares.

Pattern:
Ch 19 (22, 24, 27)
Row 1 (Foundation Row): Insert your hook in the back bump of the 2nd ch from the hook. Yo, pull up a loop. (Insert your hook in the back bump of the next ch, yo, pull up a loop) across. The number of loops on your hook should be the same as the number of chs. RetP.
Row 2: Insert hook through very first space in between the vertical bars and pull up a loop. Pull up a loop in each space (in between the vertical bars) to the end. Do NOT pull up a loop in the last space. Lts. RetP
Row 3: Skip very first space. Insert hook into the second space and pull up a loop. Pull up a loop in each space (between the vertical bars) to the end, this time including last space. Lts. RetP
Row 4- 18 (22, 24, 27): Rpt Row 2-3
Row 19 (22, 24, 27): Bind off using sl sts
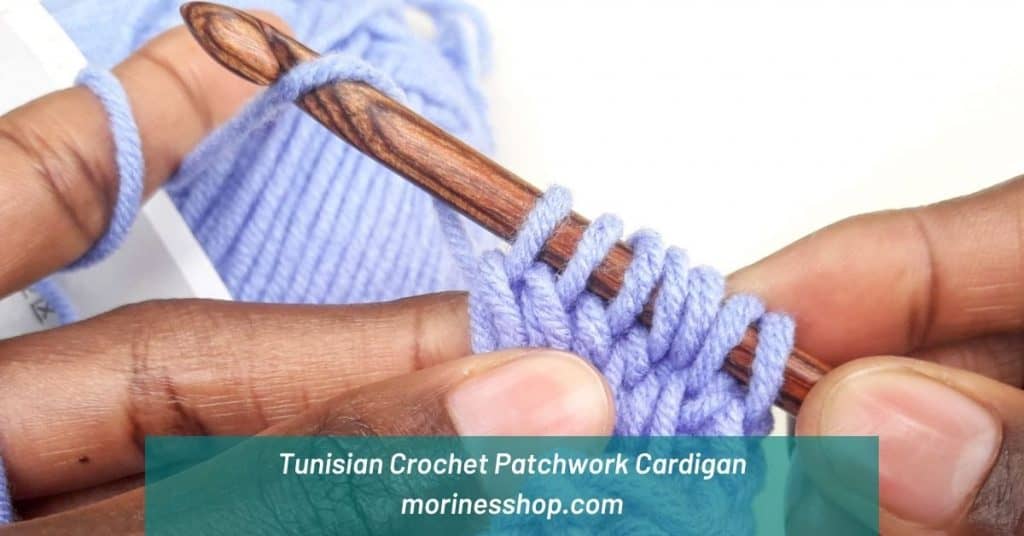
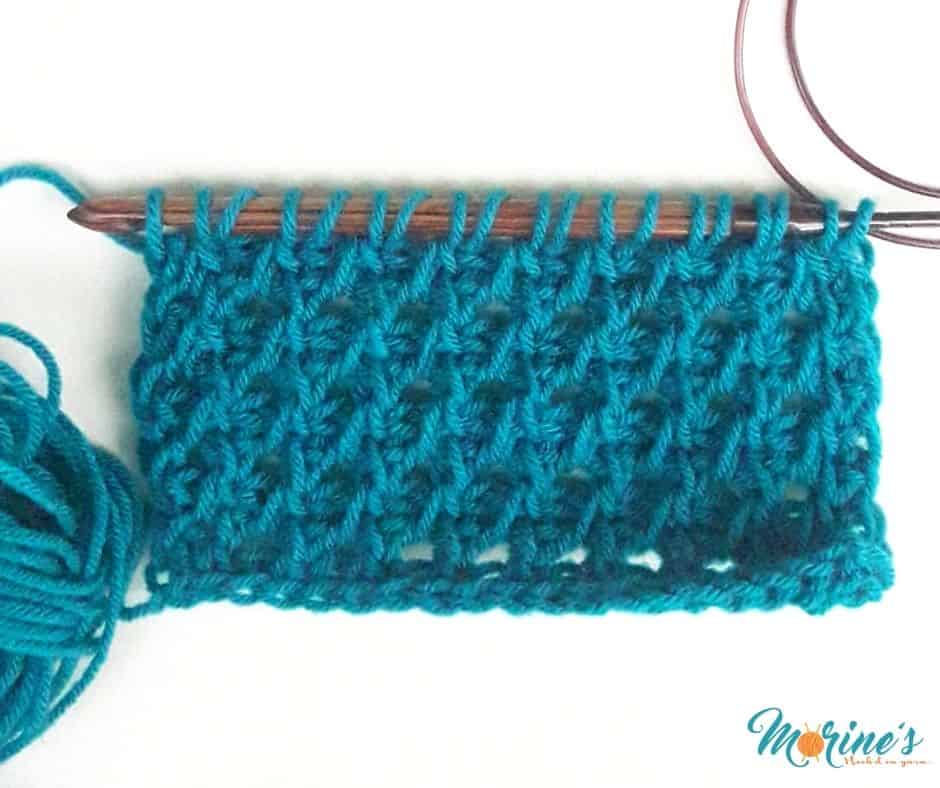
Patchwork Cardigan Week 1: Tunisian Simple Stitch (tss)
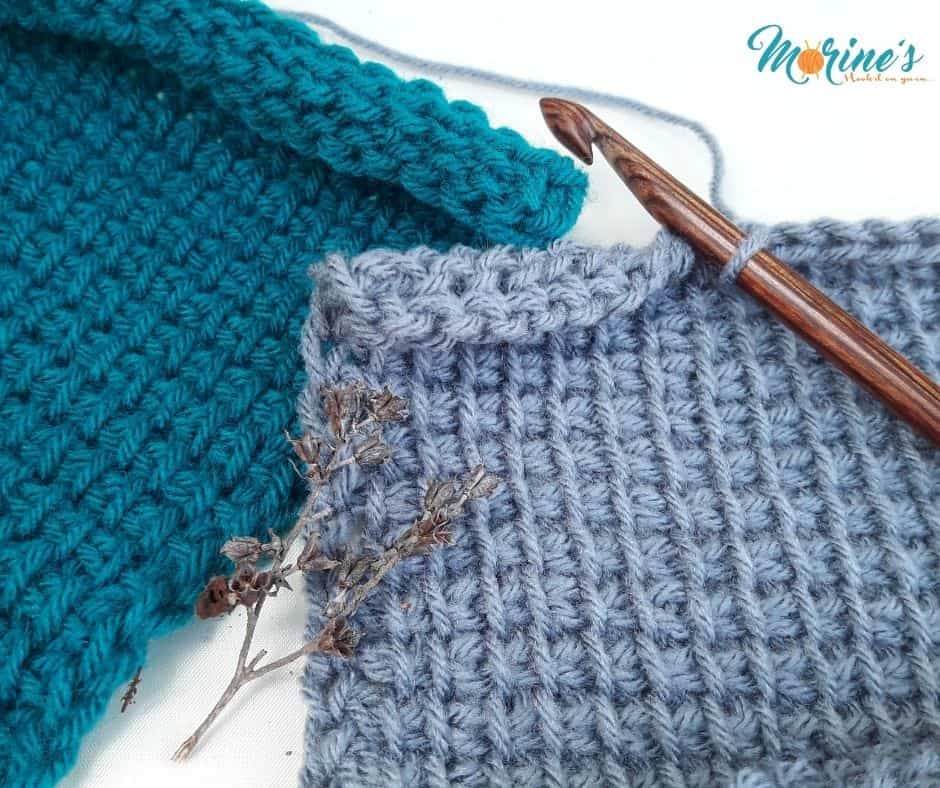
Tunisian simple stitch is the first stitch many people learn when picking up Tunisian crochet. As the name suggests, it is one of the easiest stitches to master, so it figures it should be the first square we try out. It has a one-row repeat and can be worked over any number of stitches. For the forward pass, you work into the vertical bars which are easily visible in the picture above. Click here for a video tutorial on the stitch. I used teal and dark grey for my squares.
Pattern:
Ch 19 (22, 24, 27)
Row 1 (Foundation Row): Insert your hook in the back bump of the 2nd ch from the hook. Yo, pull up a loop. (Insert your hook in the back bump of the next ch, yo, pull up a loop) across. The number of loops on your hook should be the same as the number of chs. RetP.
Row 2- 18 (21, 23, 26): (Insert hook in the vertical bar, yo, pull up a loop) across. Lts. RetP
Row 19 (22, 24, 27): Bind off using sl sts
Prep week: Jan 3- Jan 9
Take this week (or rather what’s left of it) to gather your supplies. It’s also a great time to pick up yarn and choose a colour palette if you like. I have great Pinterest Boards for colour inspiration and patchwork cardi inspos as well, so you can check them out. I’m using light worsted weight yarn from my stash with a 7 mm crochet hook from Knitpro.
Related Posts


In the Tunisian cardigan cal, the honeycomb pattern is incorrect. Rows 2+3 shouldn’t be the same
Thanks for pointing that out. I’ve corrected the error.
Question on the Tunisian Double Stitch. How do you count the rows on that square? Is it by the number of rows of the double stitch or is it by counting the chains on the side of the piece of work? If I count by the rows of the double stitch, then the piece of work will be twice as long as the other squares. Just curious.
Hi Cindy. You count the number of double crochet rows. That’s why for that particular square, the rows are almost half what we would usually work. It took a minute for the update to load.
Hi!
I just found this CAL and would like to catch up!
If I were to use worsted weight and an 8mm or 9mm hook (my stash is mostly worsted), would I just follow the directions to make 1 size smaller in the cardigan, e.g. Follow the stitch counts for the smallest size [XS/S/M] rather than the next one [L/XL].
Perhaps I missed it, but what is the original estimated yardage in DK for the various sizes?
Awesome Belle.
What you’ll do is make week one square in the largest size i.e. the tunisian simple stitch in size 4XL/5XL. Use this as the gauge swatch to figure out how big a square should be using the materials you have. Does that make sense? Let me know if you need more help.
And the yardage per square depends on the size and pattern of each square but so far it’s approximately between 25-30 yards
Please can this be released in a printer friendly pattern. Thank you 🙏
Hi Lizzie. I’m working on it and I’ll be sure to let you know once it’s up.
Hello. I’ve recently learned Tunisian crochet and love doing it. Checking Pinterest this morning and saw your cardi mentioned. Would it work using the same colour and 3 or 4 different squares only? I’m not a many colours person. I’m not sure of the patterns I’ll use yet but will study them all to make my decision. Your help and advice on this would be greatly appreciated.
Hello Susan. Sorry for the late reply. It would work with 3 or 4 squares in one colour. You can try using 2 or more shades of the same colour as well.