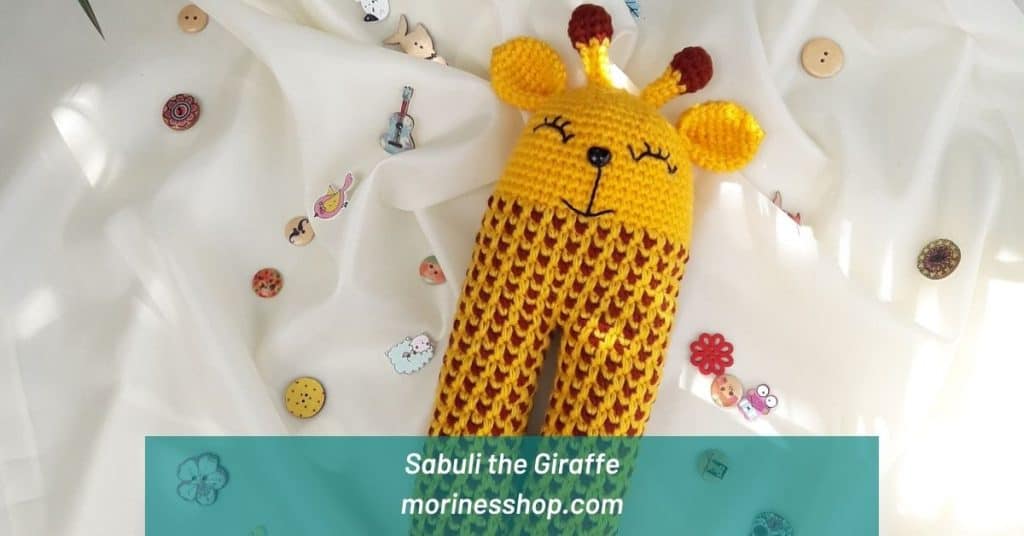
Sabuli the Giraffe is a crochet giraffe pattern that uses a combination of well-loved stitches to make a unique amigurumi giraffe. Sabuli is named after a Kenyan Wildlife Conservancy with the same name. It’s located in the northern part of Kenya and is a Haven not only for giraffes but other wildlife as well.

Get Sabuli the Giraffe
- Free pattern: Keep scrolling for the FREE version of this crochet giraffe amigurumi pattern
- Printable PDF: Pick up the beautifully formatted, ad-free PDF version of Sabuli from Ravelry
About this crochet giraffe pattern
Sabuli uses moss stitch to achieve beautiful colourwork through the legs and part of the body. I’ve always loved moss stitch. After some experimenting, I’ve managed to use this technique on dozens of dolls and a couple of designs like The Magical Owl Keychain and Rainbow Bee.
More moss stitch patterns
Using this pattern, you can crochet your own wonderful long-legged toy giraffe. The toy can be used to decorate the nursery, complement the first photo session with the baby or even a baby shower gift! Your child will love it and it will become their favorite toy!

Sabuli the Giraffe pattern
Skill Level: Beginner
Materials:
- Acrylic DK yarn in:
- 30 yards of Mustard (MC)
- 20 yards of Rust (CC)
- 1 yard of black fingering weight yarn
- 3.5 mm crochet hook
- 10 mm black safety nose
- Stitch marker
- Pins
- Scissors
- Darning needle
- Toy stuffing
Stitches and terms used:
- Ch= chain
- Sl st= slip stitch
- Sc= single crochet
- “= inch(es)
- Rpt = repeat
- St(s)= stitch(es)
- Sp(s)= space(s)
- MC= Main Colour
- CC= Contrasting Colour
- Inc= increase: 2 sc in the same space
- Dec= decrease: single crochet two together
- Deep sc= deep single crochet- is worked in the skipped sc of the previous round


Size: With the yarn and hook specified Sabuli is approximately 11” from tip of horn to foot.
Yarn alternatives: Any DK, #3 or 8 ply yarn
Gauge: Using DK yarn and 3.5 mm crochet hook, 10 sts & 10 rows in sc = 2”
Notes:
- Read through the pattern before starting your work just to be sure you don’t have any questions that might cause frustration while working on the project.
- This pattern is written in US terms. For a conversion into UK terms, get my free eBook with the conversion charts here.
- The pattern is worked from bottom up in continuous rounds into the st as normal (unless otherwise stated).
- This pattern starts with a magic ring. For a detailed tutorial on how to work and secure the magic ring, read through my blog post on the same.
- Repeating sections within the rounds are shown in round () brackets followed by the number of times they are repeated e.g. (sc, inc) 6 times means the sequence in the brackets must be repeated a total of 6 times.
- Stitch totals are shown in square [] brackets at the end of each round e.g. [18] means you should have a total of 18 stitches at the end of the round.
- Make all colour changes in the last 2 loops of the final stitch of the old colour.
Instructions:
1. Legs (make 2)
With CC DK yarn and 3.5 mm hook,
Rnd 1: In a magic circle, work 6 sc [6]
Rnd 2: (inc) 6 times [12]
Rnd 3: (sc, inc) 6 times [18]
Rnd 4: (2 sc, inc) 6 times [24]
Rnd 5: sc in each st across [24]
Rnd 6: (ch 1, sk 1 st, sc in next st) 12 times [12 sc & 12 ch-1 sps]


Front this point you’ll interchange between CC and MC. The colour to use is indicated at the beginning of each rnd. Refer to the notes on how to make colour changes.
Rnd 7: Join in MC, (deep sc, sc in next st) 12 times [24]

Rnd 8: Pick up CC, (ch 1, sk 1 st, sc in next st) 12 times [12 sc & 12 ch-1 sps]
Rnd 9-32: Rpt Rnd 7-8 13 times
Start slowly stuffing as you continue to crochet from Rnd 20. Fasten off and leave a 3” tail on the 1st leg.

Crochet the 2nd leg in the same way but don’t fasten off.

2. Body
Insert your hook into the 1st leg and crochet in rnds from here throughout:
Rnd 33: Pick up MC, (deep sc, sc in next st) 12 times along the 1st leg. Moving on to the 2nd leg, (deep sc, sc in next st) 12 times [48]


Rnd 34: Pick up CC, (ch 1, sk 1 st, sc in next st) 24 times [24 sc & 24 ch-1 sps]
Rnd 35: Pick up MC, (deep sc, sc in next st) 24 times [48]
There will be a hole between the legs. Use the tail you left from the 1st leg to sew it closed. Fasten off.

Rnd 36-45: Rpt Rnd 31-32 5 times
Fasten off CC.

Rnd 46-54: sc in each st across [48]

Rnd 55: (6 sc, dec) 6 times [42]
Rnd 56: (5 sc, dec) 6 times [36]
Rnd 57: (4 sc, dec) 6 times [30]
Insert safety nose at Rnd 50, st 27
Rnd 58: (3 sc, dec) 6 times [24]
Rnd 59: (2 sc, dec) 6 times [18]
Rnd 60: (sc, dec) 6 times [12]
Rnd 61: (dec) 6 times [6]
Fasten off. Leave tail and use it to sew the top closed.
3. Horns (make 2)

With CC DK yarn and 3.5 mm hook,
Rnd 1: 6 sc into magic circle [6]
Rnd 2: (inc) 6 times [12]
Rnd 3-4: sc in each st across. [12]
Start stuffing. Join in MC and fasten off CC
Rnd 5: (dec) 6 times [6]
Rnd 6-9: sc in each st across [6]
Fasten off. Leave tail for sewing on body.
4. Ears (make 2)
With MC DK yarn and 3.5 mm hook,
Rnd 1: 3 sc into magic circle [3]
Rnd 2: (inc) 3 times [6]
Rnd 3: (inc) 6 times [12]
Rnd 4: (sc, inc) 6 times [18]
Rnd 5-9: sc in each st across [18]
Rnd 10: Fold in half and sc through both layers. [9]


Fasten off. Leave tail for sewing on head. Do not stuff.

Finishing:
- Use your pins to position the horns on top and the ears to the side of the head as shown below:

- Sew them to the head.
- Using your pins again, mark out the areas where you’ll embroider the eyes. Use the photo below to guide you.

- Thread a long piece of black yarn to your darning needle. Start with the eyes to your right and move to the one on your left.

- Embroider the mouth and smile.

And there you have it. Your very own crochet giraffe amigurumi. I’d love to see you process and finished product so please tag me @morines_shop on Instagram or share you projects on Ravelry.

Related Posts